
To use the Kimi K3.1 Pro API, obtain an API key from a supported provider, configure the API endpoint, select the model ID kimi-k3.1-pro, and send an authenticated Chat Completions request. You can use PowerShell, cURL, Python, or an OpenAI-compatible client to generate code, build AI agents, and inspect token usage.
Getting a response is only the first step. Coding agents may consume substantial reasoning and cached-context tokens, while configuration mistakes, repeated tool calls, and unnecessary retries can increase costs. Developers need a workflow that connects successfully, produces verifiable results, and makes token consumption visible.
LinkModel offers Kimi K3.1 Pro through a unified API at $1.90 per million input tokens and $9.50 per million output tokens, both 5% below the corresponding official published rates. With $0 minimum spend and $0 monthly platform fee, developers can start with a small request, inspect actual usage, and expand their integration as needed.

What Is the Kimi K3.1 Pro API?
The Kimi K3.1 Pro API is a developer interface for accessing Moonshot AI's reasoning model, released on October 23, 2026. It enables applications to use Kimi for code generation, debugging, long-context analysis, multimodal understanding, and tool-assisted workflows without deploying model infrastructure.
Kimi K3.1 Pro is particularly relevant to development tasks that involve multiple files, complex instructions, or iterative problem-solving.
Kimi K3.1 Pro Specifications
| Feature | Specification |
|---|---|
| Developer | Moonshot AI |
| Release date | October 23, 2026 |
| API model ID | kimi-k3.1-pro |
| Context window | 1,048,576 tokens |
| Default maximum output | 131,072 tokens |
| Supported input | Text, images, video |
| Output | Text |
| Function calling | Supported |
| Reasoning | Always enabled |
| Separate Highspeed model | kimi-k3.1-pro-highspeed |
The large context window is useful when an application must work with extensive repository content or conversation history. However, a larger context window does not eliminate token costs or guarantee better results.
For coding agents, task completion, output correctness, elapsed time, and total token consumption are all relevant evaluation criteria.
Kimi K3.1 Pro vs Highspeed
Kimi K3.1 Pro and Kimi K3.1 Pro Highspeed belong to the same model family but use different API identifiers.
Moonshot describes the Highspeed variant as providing approximately two to three times faster output generation. That does not automatically translate into the same improvement in end-to-end task completion time.
Choose the standard model when cost predictability matters more than response speed. Consider Highspeed for interactive applications where faster generation has measurable value.
For either version, compare the actual rate offered by your selected API provider before deploying it.
How to Get a Kimi K3.1 Pro API Key
You can obtain API access directly through Moonshot AI or through LinkModel, which provides a unified gateway for supported models.
The key must belong to the provider whose endpoint you are using. A Moonshot API key should not be used as a LinkModel API key, or vice versa.
Get an API Key Through LinkModel
To get started with Kimi K3.1 Pro on LinkModel:
1. Visit LinkModel and create an account.
2. Open the Dashboard.
3. Generate an API key in the API key management area.
4. Locate Kimi K3.1 Pro in the supported model catalog.
5. Check the model ID and published prices.
6. Save your API key securely and make a small test request.
New users automatically receive $1 in free Credits when they register, with no payment card required and no recharge required. Existing users cannot claim this signup reward again. The gifted Credits never expire and are applicable to all models currently available on LinkModel.
This allows a first-time developer to evaluate Kimi K3.1 Pro before deciding whether to add funds. The Credits cover usage according to the model's applicable token rates rather than providing unlimited API requests.
Get an Official Moonshot API Key
For direct access:
1. Open Moonshot's API platform.
2. Register or sign in to your developer account.
3. Create an API key.
4. Review the account's funding and model-access requirements.
5. Configure the official API endpoint.
6. Test the model with a short request.
The international Moonshot OpenAI-compatible base URL is https://api.moonshot.ai/v1.
The direct API, consumer subscription plans, and Kimi Code usage allowances have different access and billing arrangements. Check the conditions of the service you actually plan to use.
What Is the Correct Kimi K3.1 Pro API Model ID?
The standard API model identifier is:
kimi-k3.1-pro
For the separate Highspeed variant, the identifier is:
kimi-k3.1-pro-highspeed
Do not automatically reuse identifiers from older Kimi versions or consumer coding tools. A correct model identifier is essential for ensuring requests reach the intended version.
How to Use Kimi K3.1 Pro API: PowerShell, Python, and cURL
The basic integration follows a standard sequence: configure authentication, build a JSON request containing the model and messages, send it to the Chat Completions endpoint, and inspect the response.
For LinkModel, the endpoint used in our successful Kimi K3.1 Pro test was:
https://api.linkmodel.ai/v1/chat/completions
The following examples cover three approaches. PowerShell is the workflow used in our documented request; Python and cURL provide equivalent starting points for developers using those environments.
Use PowerShell to Make Your First API Request
Windows users can call Kimi K3.1 Pro through PowerShell without installing Python or a separate API testing application.
First, securely load your LinkModel API key into a PowerShell variable:
$apiKey = Read-Host "Enter your LinkModel API Key"Then configure the endpoint:
$url = "https://api.linkmodel.ai/v1/chat/completions"Create the request data:
$data = @{
    model = "kimi-k3.1-pro"
    messages = @(
        @{
            role = "user"
            content = "Write a Python function that returns True if a number is even and False otherwise."
        }
    )
}
Convert the request into JSON:
$body = $data | ConvertTo-Json -Depth 5Set the authentication headers:
$headers = @{
    Authorization = "Bearer $apiKey"
    "Content-Type" = "application/json"
}
Send the request:
$response = Invoke-RestMethod `
    -Uri $url `
    -Method Post `
    -Headers $headers `
    -Body ([System.Text.Encoding]::UTF8.GetBytes($body)) `
    -ErrorAction Stop
View the response:
$response.choices[0].message.contentInspect token usage:
$response.usage | ConvertTo-Json -Depth 10For a successful request, the response should contain an assistant message. Usage information can show how many tokens were consumed by the request.
Keep API keys out of screenshots, source repositories, and shared logs.
Python Example: Call Kimi K3.1 Pro
If you prefer Python, install the OpenAI SDK:
pip install openaiStore your API key in an environment variable named LINKMODEL_API_KEY.
The corresponding OpenAI-compatible request can be written as:
import os
from openai import OpenAI

client = OpenAI(
    api_key=os.environ["LINKMODEL_API_KEY"],
    base_url="https://api.linkmodel.ai/v1"
)

response = client.chat.completions.create(
    model="kimi-k3.1-pro",
    messages=[
        {
            "role": "user",
            "content": "Write a Python function that returns True if a number is even and False otherwise."
        }
    ]
)

print(response.choices[0].message.content)
print(response.usage)
This SDK example illustrates the documented OpenAI-compatible request format. The PowerShell call described above is the implementation verified in our recorded test.
cURL Example: Send a Chat Completions Request
Developers working with a Unix-like terminal can use cURL:
curl https://api.linkmodel.ai/v1/chat/completions \
  -H "Authorization: Bearer $LINKMODEL_API_KEY" \
  -H "Content-Type: application/json" \
  -d '{
    "model": "kimi-k3.1-pro",
    "messages": [
      {
        "role": "user",
        "content": "Explain how binary search works in Python."
      }
    ]
  }'
This example assumes LINKMODEL_API_KEY is already set as an environment variable in the shell.
The API returns a JSON response. Inspect the model, choices, completion status, and usage fields when available.
Real API Test: Generating a Python Cost Calculator
To demonstrate a coding workflow, we submitted a Kimi K3.1 Pro request through LinkModel using PowerShell.
The prompt requested a Python function that calculates API costs with these specific rates:
- Input: $1.90 per million tokens.
- Output: $9.50 per million tokens.
- Example usage: 100,000 input tokens and 10,000 output tokens.
The response generated the following Python code:
INPUT_RATE = 1.90
OUTPUT_RATE = 9.50

def calculate_api_cost(input_tokens, output_tokens):
    input_cost = (input_tokens / 1_000_000) * INPUT_RATE
    output_cost = (output_tokens / 1_000_000) * OUTPUT_RATE
    return input_cost + output_cost

total_cost = calculate_api_cost(100000, 10000)
print(f"Total cost: {total_cost:.3f} USD")
The returned code correctly calculates the specified workload at $0.285.
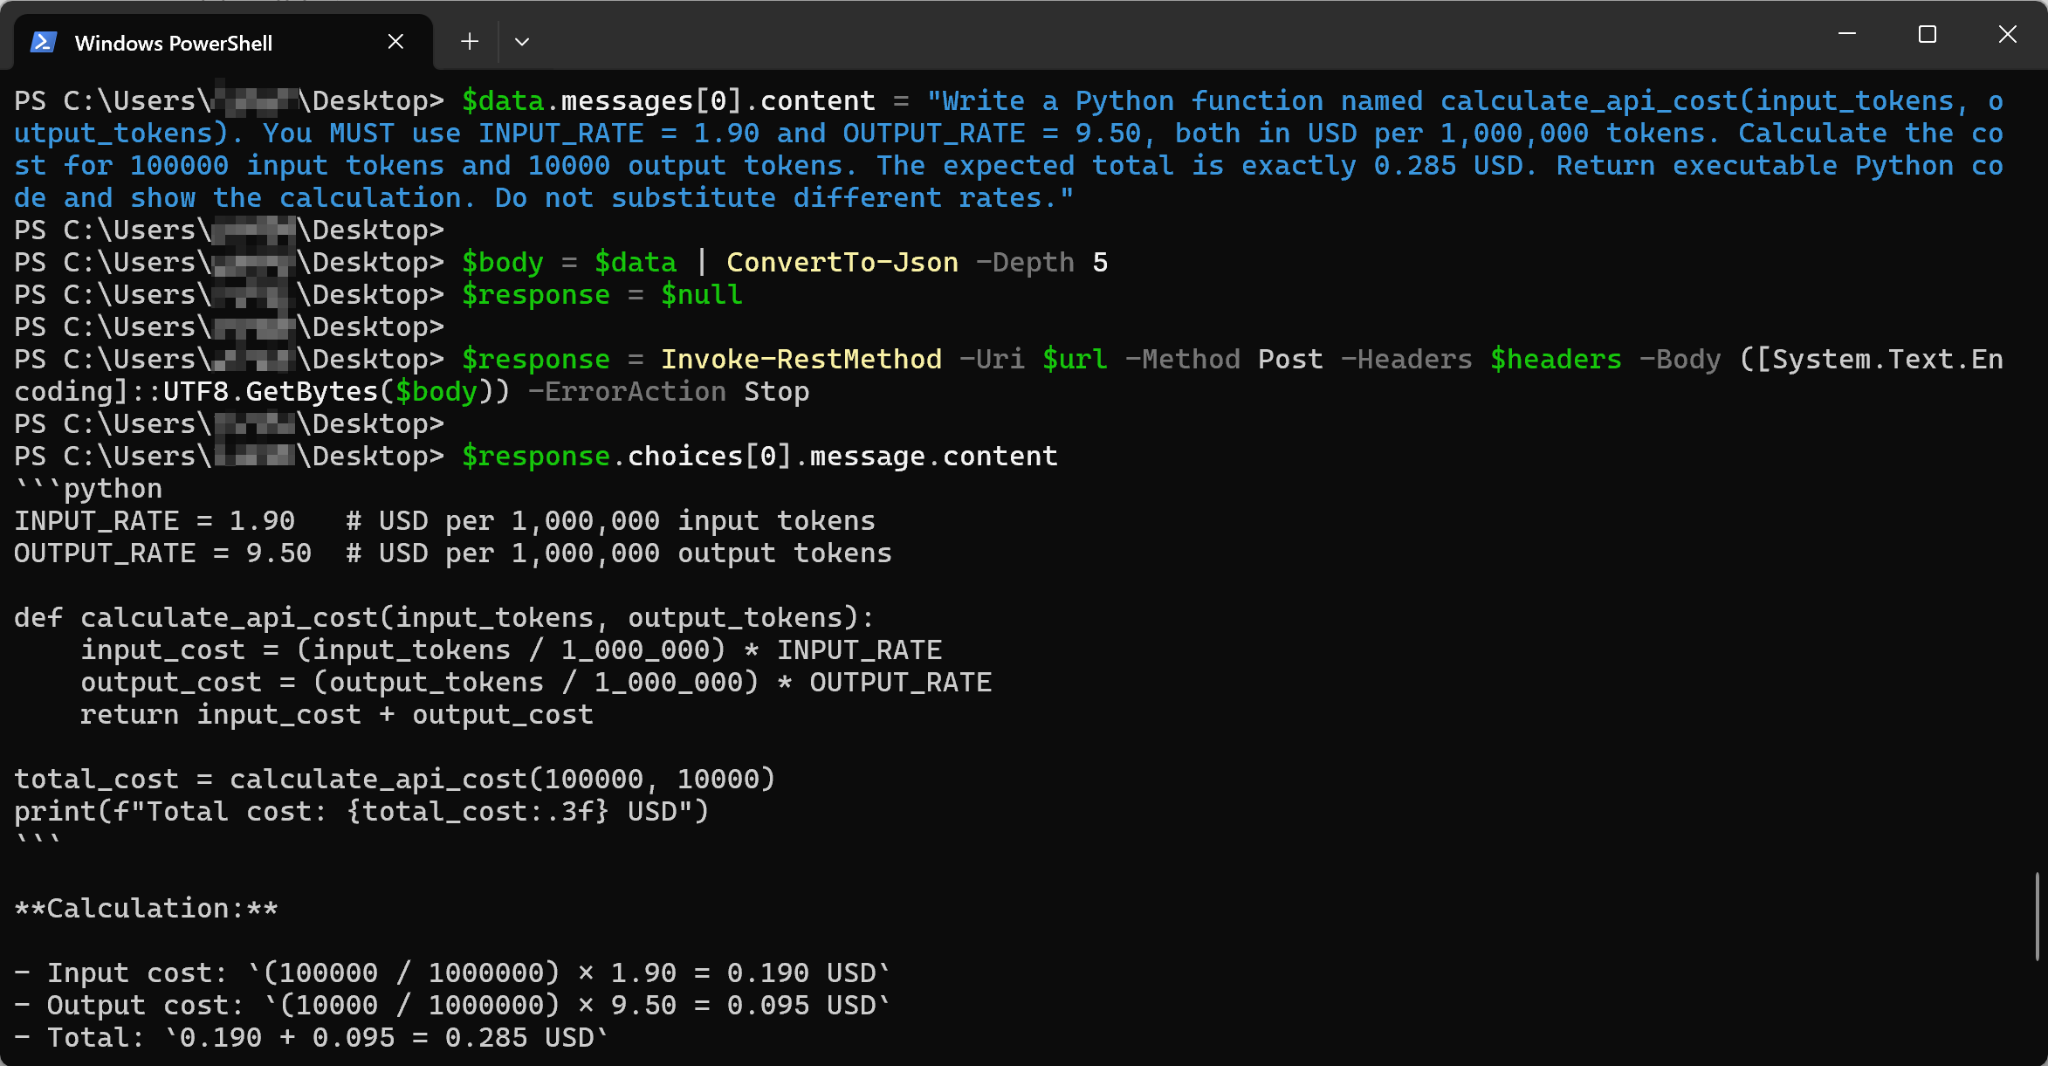
The corresponding calculation is:
Input cost = 100,000 ÷ 1,000,000 × $1.90 = $0.190
Output cost = 10,000 ÷ 1,000,000 × $9.50 = $0.095
Estimated workload cost = $0.285
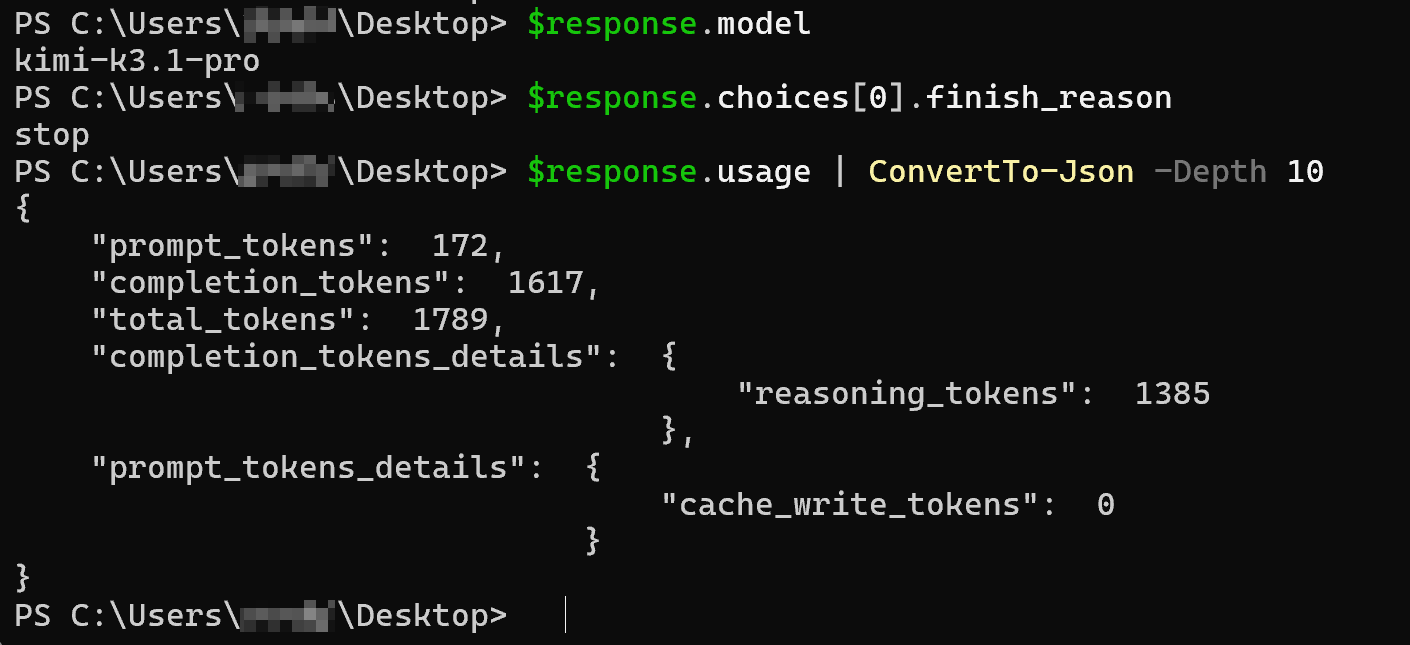
The API request itself also returned token usage information:
| Usage metric | Recorded value |
|---|---|
| Prompt tokens | 172 |
| Completion tokens | 1,617 |
| Reasoning tokens | 1,385 |
| Total tokens | 1,789 |
| Response model | kimi-k3.1-pro |
| Finish reason | stop |
The reasoning tokens are included within completion tokens and must not be added a second time.
This example demonstrates successful connectivity, code generation, and usage reporting. The Python code's calculation was independently checked against the specified rates.
How to Verify Your API Response
A successful HTTP request confirms that the API accepted and processed the request, but application-level verification is still important.
For a basic Kimi K3.1 Pro integration, check these fields:
| Response field | What to verify |
|---|---|
| model | The intended model responded |
| choices[0].message.content | The response contains the requested content |
| choices[0].finish_reason | The completion ended as expected |
| usage.prompt_tokens | Input usage is recorded |
| usage.completion_tokens | Completion usage is recorded |
| usage.total_tokens | Total usage is recorded |
If you generate code, review the resulting function and test it before using it in production.
For cost-related applications, calculate an expected answer independently and check that the generated code uses the correct numerical inputs.
Understand Reasoning Tokens and Streaming Responses
Kimi K3.1 Pro is designed for reasoning-intensive tasks, including software development, debugging, and multi-step problem-solving.
In our successful API request, 1,385 of the 1,617 completion tokens were reported as reasoning tokens.
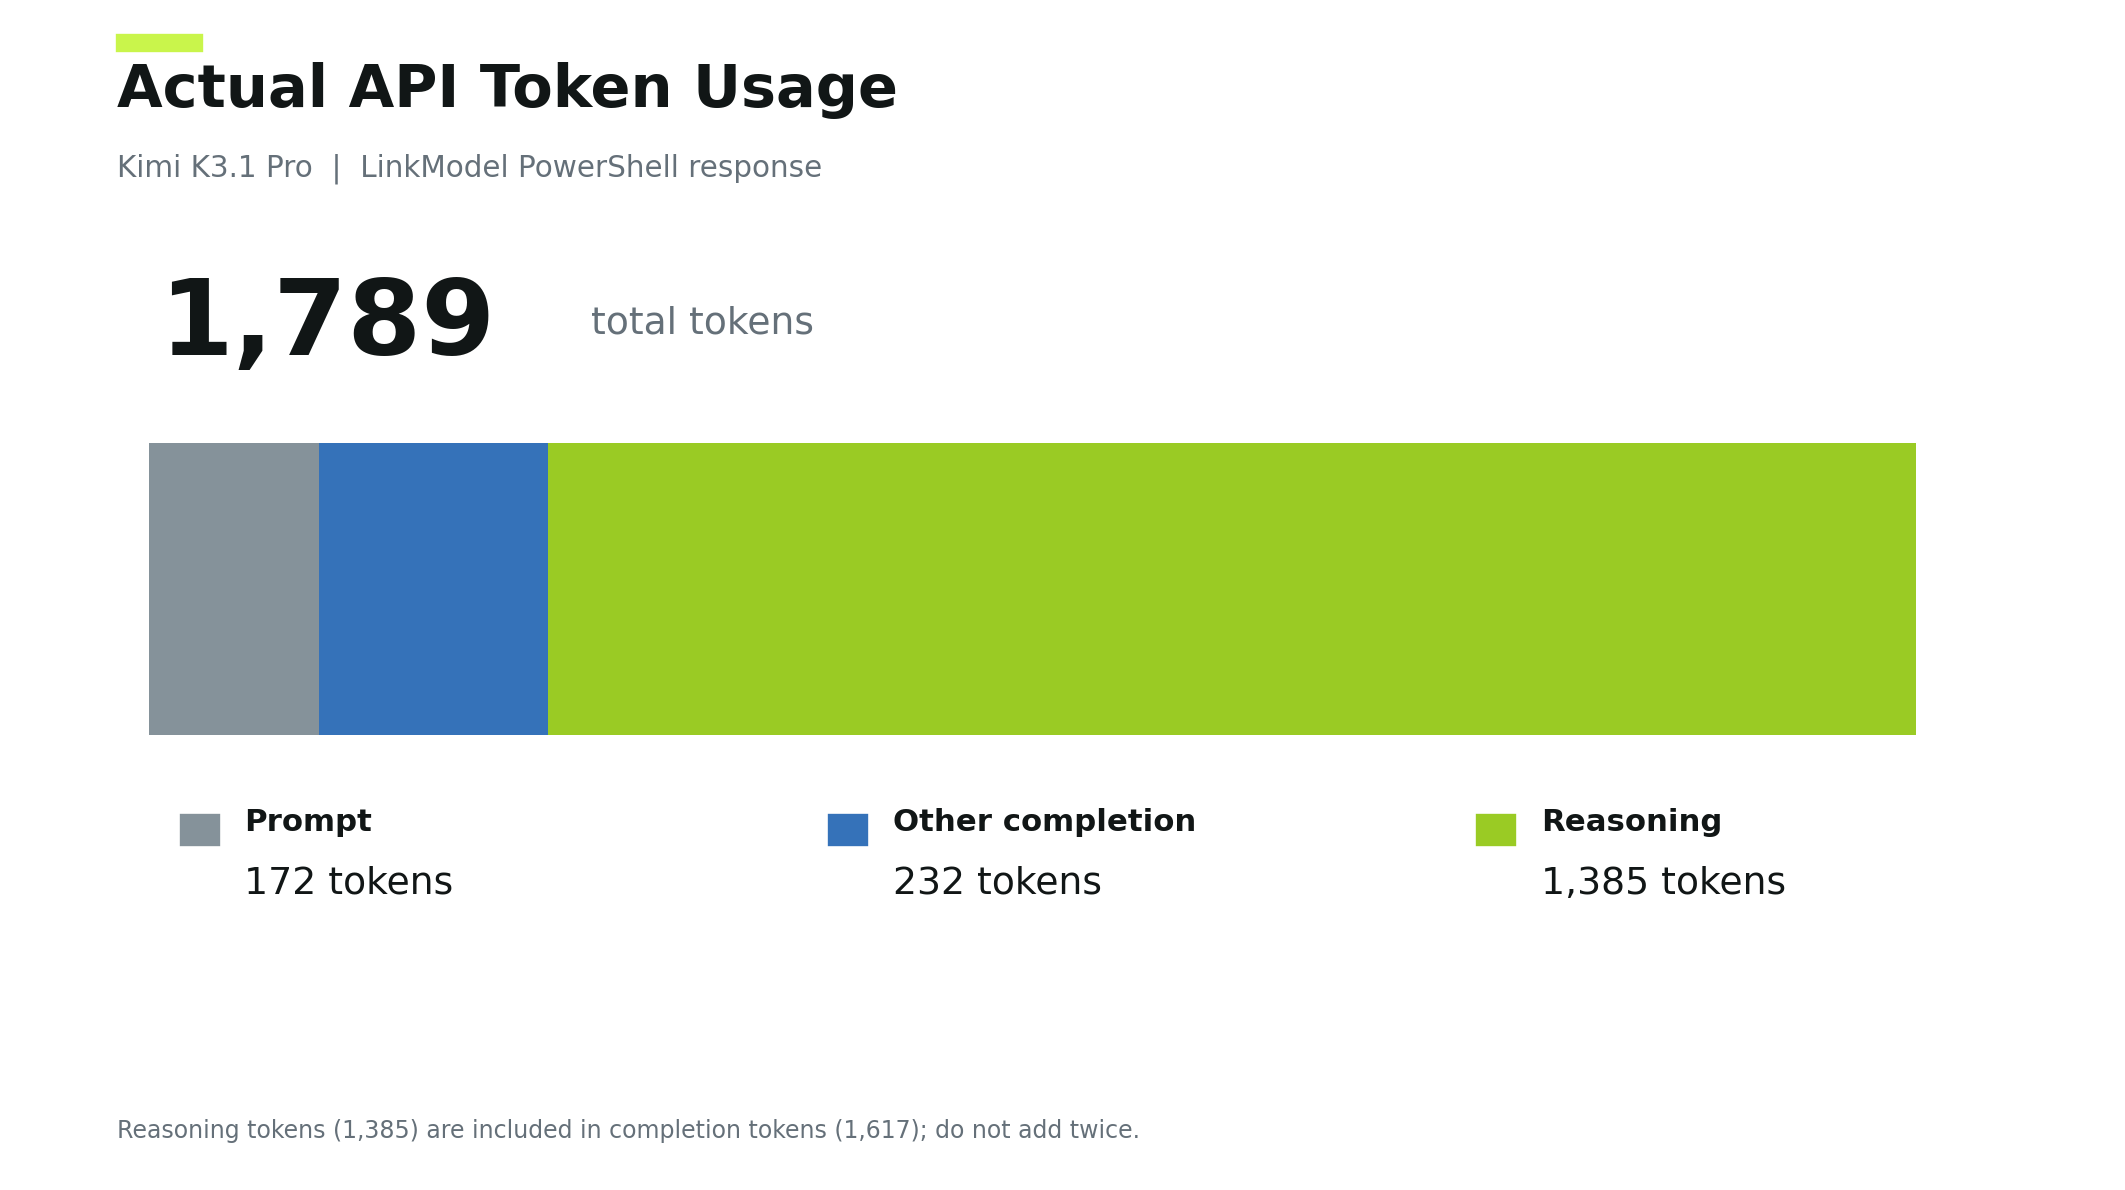
This is an important distinction because developers might otherwise calculate expenses using only the visible final answer rather than the completion usage reported by the API.
Streaming responses can deliver generated content incrementally for interactive applications. Developers integrating streaming should follow their selected provider's current request and response documentation.
For initial integration, a standard non-streaming request is often easier to verify before adding more complex response-handling logic.
Kimi K3.1 Pro API Pricing: Official vs LinkModel
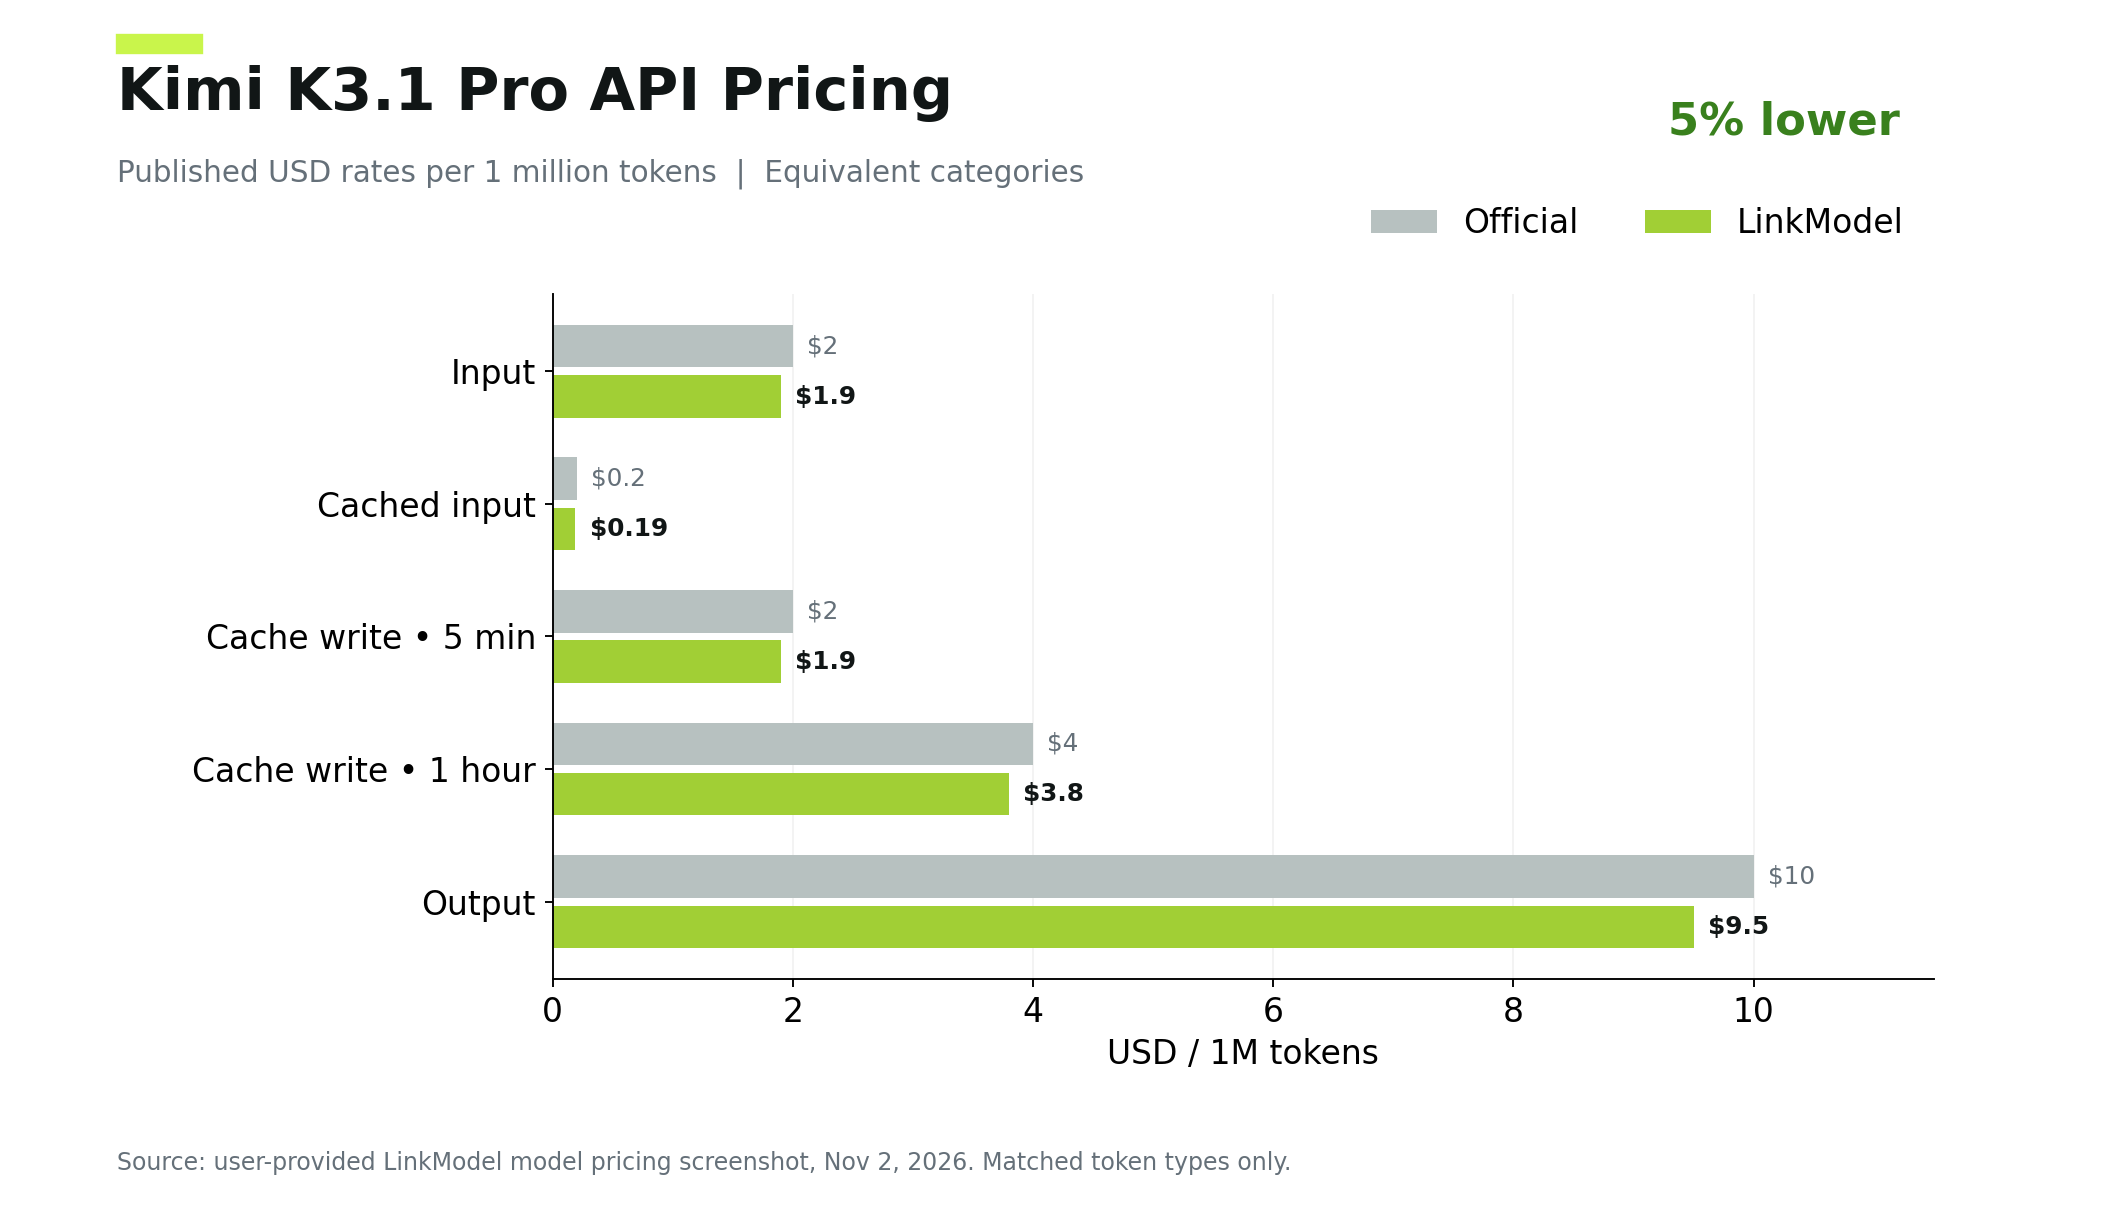
The published standard Kimi K3.1 Pro API rates on LinkModel are 5% below the corresponding official prices for input, cached input, cache writing, and output.
The correct way to compare the rates is to use the same token category and the same billing unit.
Kimi K3.1 Pro API Pricing Comparison
| Token type | Official | LinkModel | Savings |
|---|---|---|---|
| Input | $2.00/M | $1.90/M | 5% |
| Cached input | $0.20/M | $0.19/M | 5% |
| Cache write, 5 min | $2.00/M | $1.90/M | 5% |
| Cache write, 1 hour | $4.00/M | $3.80/M | 5% |
| Output | $10.00/M | $9.50/M | 5% |
All prices are in USD per million tokens.
For ordinary non-cached input and output, the estimated cost formula is:
Cost = (input tokens ÷ 1,000,000 × input rate) + (output tokens ÷ 1,000,000 × output rate)
The complete bill for a larger application can also depend on cached input, cache writes, additional requests, tool operations, and other applicable charges.
How Much Did Our Actual Kimi API Request Cost?
Our recorded request used 172 prompt tokens and 1,617 completion tokens.
Using LinkModel's published standard rates, the estimated charges are:
| Component | Calculation | Estimated cost |
|---|---|---|
| Input | 172 × $1.90/M | $0.0003268 |
| Completion | 1,617 × $9.50/M | $0.0153615 |
| Total | $0.0156883 |
The estimated total is approximately $0.0157, or 1.57 US cents.
This is a calculation based on the returned usage and standard token rates, not a separate account billing receipt. It assumes the recorded completion tokens are charged at the listed output rate and the input is non-cached.
The $0.285 calculation generated in the coding example represents the hypothetical 100,000-input-token and 10,000-output-token workload requested in the prompt. It is not the cost of our actual API call.
How Prompt Caching Affects Kimi K3.1 Pro API Costs
Prompt caching can reduce the cost of eligible repeated context, but a cache hit and a cache write are not the same billing event.
The key scenarios are:
| Scenario | How the repeated context is charged |
|---|---|
| Initial request | Applicable fresh-input or cache-write rates |
| Cache hit | Eligible reused tokens at the cached-input rate |
| Cache miss | Tokens charged according to the applicable fresh-input or write category |
For LinkModel's published pricing, cached input is $0.19 per million tokens. A five-minute cache write is $1.90/M, while a one-hour cache write is $3.80/M.
Consider a request with:
- 1,000,000 cached input tokens.
- 100,000 fresh input tokens.
- 20,000 output tokens.
If all 1,000,000 repeated input tokens qualify for the listed cache-hit rate, the cost calculation is:
| Component | Calculation | Cost |
|---|---|---|
| Cached input | 1M × $0.19 | $0.190 |
| Fresh input | 0.1M × $1.90 | $0.190 |
| Output | 0.02M × $9.50 | $0.190 |
| Total | $0.570 |
Now consider the same workload without a cache hit, assuming the full 1.1 million input tokens are charged at the ordinary input rate:
Input: 1.1M × $1.90 = $2.090
Output: 0.02M × $9.50 = $0.190
Total = $2.280
The two scenarios differ by $1.71 in calculated model charges. This illustrates the potential value of cache reuse for repeated context, not a guaranteed saving for every request.
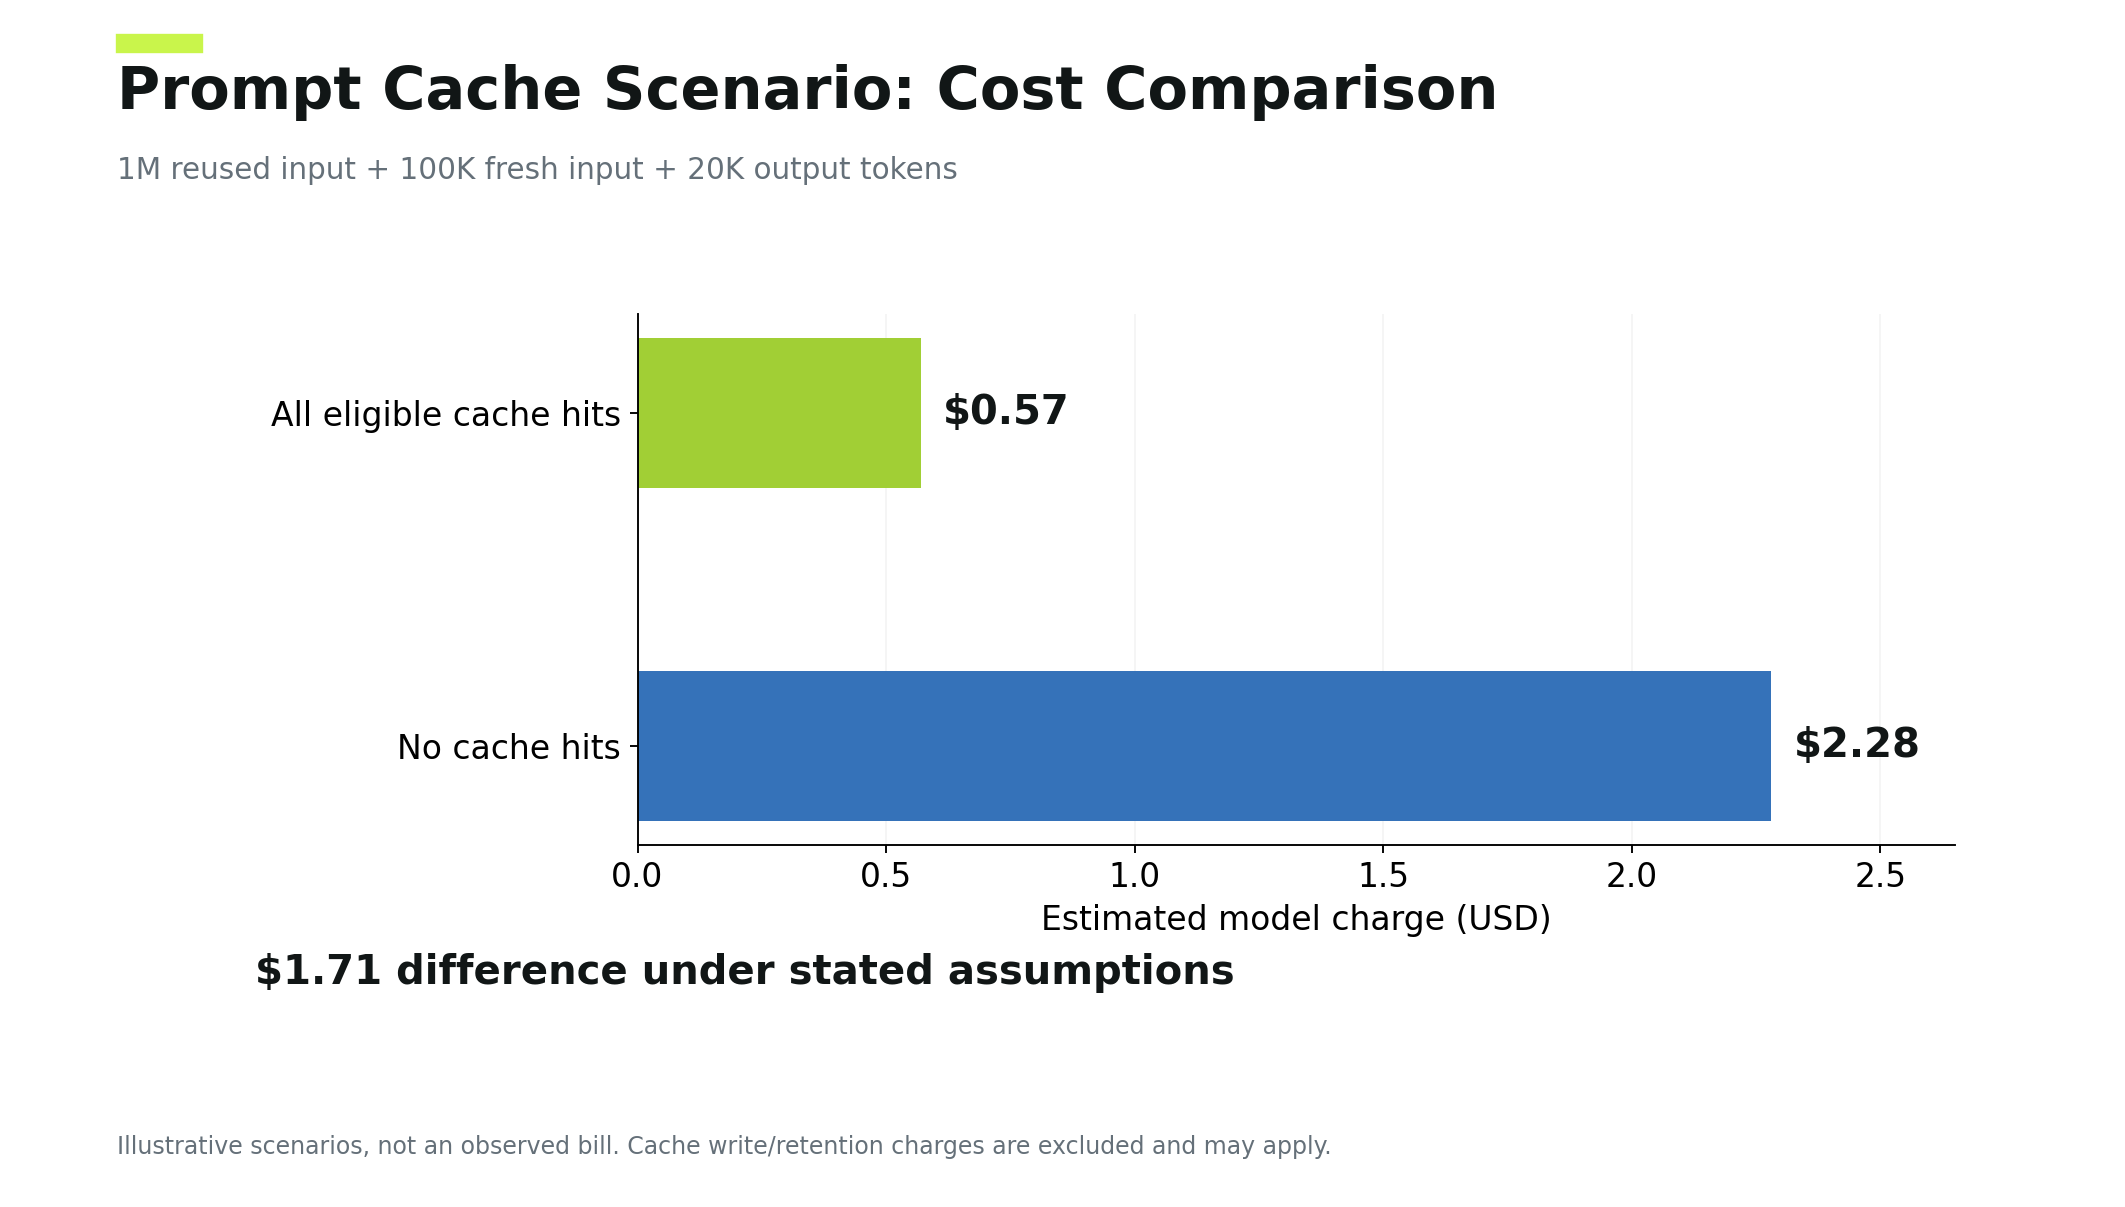
An application must first establish eligible cached context, and the applicable write rate or retention window can affect the total cost. Developers should inspect actual token-category usage and billing rather than assume every repeated prompt qualifies for the cached-input rate.
Estimate the Cost of a Coding Agent
A coding agent may make multiple model requests to plan a task, inspect a repository, generate code, use tools, and repair errors.
Therefore, its cost should be measured across the entire workflow.
Total task cost = sum of billable model requests + applicable tool and additional operation charges
For each model request, record fresh input, cached input, cache writing, and output consumption where available.
Then assess the result using task completion and correctness alongside total spending.
A lower token count does not always imply a lower bill, and a lower bill does not necessarily mean the resulting code is usable.
How to Use Kimi K3.1 Pro for AI Coding Agents
Kimi K3.1 Pro can be used in AI coding workflows that require multi-step reasoning, code generation, repository analysis, and function calling.
The most important design decision is how the application controls tool execution, verifies intermediate results, and limits repeated work.
How Function Calling Works With Kimi K3.1 Pro
Function calling allows an application to expose defined operations to a model. The model can request a tool call, while the application is responsible for executing the operation and returning the result.
A typical workflow contains four stages:
1. Define the tool. Specify the function name, input parameters, and expected schema.
2. Submit the request. Include the tool definition and the user's task in the API messages.
3. Execute the requested tool. Parse the returned tool call, validate its arguments, and run the approved function in your application.
4. Return the result. Send the tool output back to the model with the corresponding tool-call identifier, then retrieve its final response.
For a cost calculator, the conceptual tool definition could contain:
| Field | Example |
|---|---|
| Function name | calculate_api_cost |
| Arguments | input_tokens, output_tokens |
| Input types | Integers |
| Result | Calculated cost in USD |
The model should not be trusted to execute financial operations simply because it generated a tool-call request. Your application should validate the arguments and perform the calculation using the published rates.
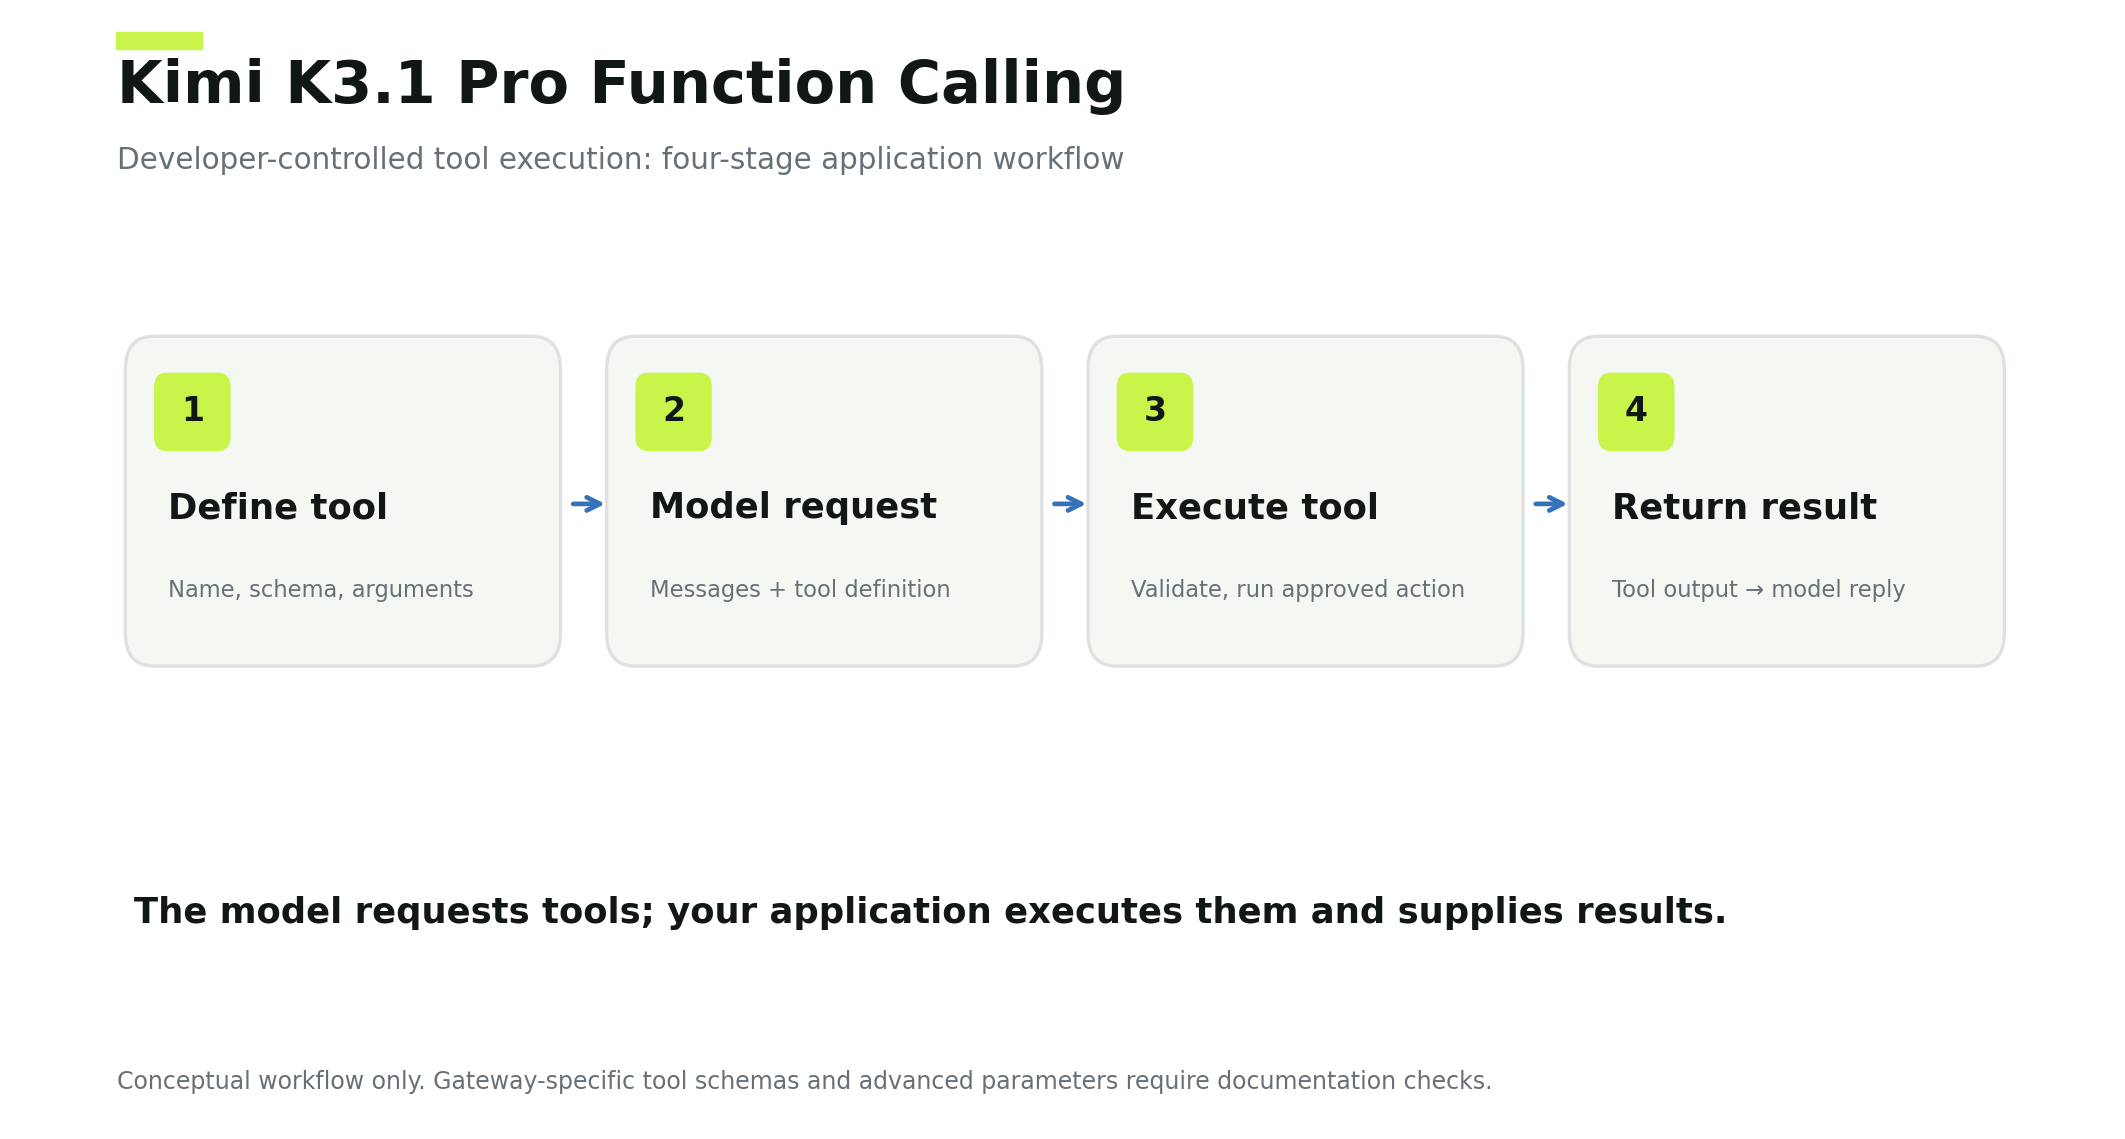
Kimi K3.1 Pro is listed as supporting function calling. The exact request parameters, tool response fields, and multi-turn message requirements should follow the current documentation for the API gateway used by your application.
What Our Research Found About Coding Agent Costs
Our review of developer feedback identified a recurring distinction: model efficiency, task completion, and API expenses must be evaluated together.
In an October 2026 Reddit case, a developer compared Kimi K3.1 Pro and DeepSeek V4.1 Flash while creating an interactive Three.js V8 engine simulation.
The task involved an engine start-and-stop interface, RPM controls, slow-motion interaction, component inspection, and multiple camera views.
The developer reported:
| Metric | Kimi K3.1 Pro | DeepSeek V4.1 Flash |
|---|---|---|
| Total tokens | 3.5M | 67.2M |
| Estimated task cost | $2.16 | $0.86 |
| Elapsed time | About 31 minutes | About 48 minutes |
| Run outcome | Completed | Manually stopped |
The Kimi run consumed far fewer total tokens, while the other run had a lower estimated monetary cost.
The DeepSeek run also involved substantial cached-token usage, and the two runs did not have identical stopping conditions. These results describe the reported developer case, rather than a controlled comparison of overall model performance.
For someone selecting a model for an agent workflow, the transferable lesson is clear: compare completed deliverables, elapsed time, input and output categories, and total billing rather than total token count alone.
Control Agent Quota and Repeated Calls
Another developer reported heavy quota consumption during a WebSocket dashboard task involving three interactive charts and a small number of sub-agents.
This was a subscription-based coding environment rather than a direct token-billed API example, but it highlights an engineering issue that also matters for API agents: repeated planning, context loading, and tool loops can make a task expensive before it is completed.
A practical workflow should establish:
- A clearly defined task objective.
- Testable intermediate milestones.
- A cap on unnecessary retries.
- Limits on sub-agent expansion.
- Logging for tool calls and usage.
- A stopping condition for unresolved failures.
For example, a real-time dashboard task can be divided into validating the WebSocket connection, rendering the first chart, and then implementing the remaining visualizations.
This structure allows the developer to identify failures earlier and avoid repeatedly regenerating unrelated parts of the project.
When Is Kimi K3.1 Pro Worth Using?
Kimi K3.1 Pro is worth evaluating for workloads that require substantial code generation, multi-step reasoning, long-context analysis, or agent-based development.
For routine short responses, a smaller model may be less costly. For complex engineering work, the additional reasoning expenditure may be worthwhile if it reduces the number of failed attempts or human corrections.
Evaluate models with task-level metrics:
| Metric | Evaluation question |
|---|---|
| Completion rate | Did the task reach its acceptance criteria? |
| Code correctness | Does the code pass relevant tests? |
| Total cost | What did the full workflow cost? |
| Retry count | How often was another attempt required? |
| Elapsed time | How long did the task take? |
| Human corrections | How much manual repair was needed? |
The appropriate model is the one that offers a suitable balance of correctness, completion, latency, and cost for the actual workload.
Common Kimi K3.1 Pro API Errors and How to Fix Them
Kimi K3.1 Pro API integration errors can come from authentication, request formatting, model identifiers, account limits, or provider-side infrastructure.
The first diagnostic step is to inspect the HTTP status code and error message rather than repeatedly sending the same request.
Common Error Codes
| Error | Likely cause | Recommended action |
|---|---|---|
| 400 | Invalid request body or parameters | Validate JSON, model ID, and supported fields |
| 401 | Missing, incorrect, or invalid API key | Check the key and selected provider |
| 403 | Access or permission restriction | Verify account and model permissions |
| 429 | Rate, quota, or capacity restriction | Inspect limits and apply bounded retries where appropriate |
| 500 | Server-side request failure | Check service status and retry cautiously |
| 503 | Service temporarily unavailable | Apply controlled backoff and investigate availability |
The exact error codes and response bodies vary across gateways.
Fix a 401 Invalid API Key Error
A 401 response generally means that authentication was unsuccessful.
During API integration, check whether the API key variable contains a valid key from the same service as the request endpoint.
In PowerShell, you can inspect whether the variable is empty without displaying its contents:
[string]::IsNullOrWhiteSpace($apiKey)If the result is True, the variable is missing or contains only whitespace.
You can load the key again:
$apiKey = Read-Host "Enter your LinkModel API Key"Then rebuild the Authorization header before resending the request.
If the key is present but requests still fail, review its status and account permissions in the provider dashboard.
Do not publish full authentication headers or expose secret values in shared screenshots.
Fix HTTP 429 and 500 Errors
HTTP 429 indicates that a request encountered a limit or capacity-related restriction.
Check concurrency, rate limits, account permissions, and provider response details before retrying.
For transient errors, use exponential backoff with jitter and respect the Retry-After header when supplied.
A 500-class error generally indicates a problem on the server side or within the request-processing infrastructure.
Do not retry indefinitely. Establish a maximum attempt count and record request identifiers, failure messages, and timing where available.
When a tool operation may have already completed, investigate its status before repeating a potentially non-idempotent action.
Fix Unexpected Token or Model Responses
If a request fails because of a context limit, check the current limits of the exact model exposed by the API gateway.
If a request succeeds but returns unexpected content, confirm:
- The model field matches the intended model.
- The request body contains the correct prompt.
- The completion finished normally.
- The client is reading the correct response field.
- Earlier responses have not been mistakenly reused after a failed request.
PowerShell users should be especially careful about reusing a previously populated $response variable after an unsuccessful API call.
Set the response variable to $null before a new test when you need to distinguish old content from a newly returned result.
For reasoning-related usage, inspect the available usage details. A model may consume reasoning tokens that are included in completion usage even when the final answer is comparatively short.
Frequently Asked Questions
How do I use the Kimi K3.1 Pro API?
Create an API key with Moonshot or LinkModel, configure the matching base URL, and send a Chat Completions request with the model ID kimi-k3.1-pro. Verify the response content, completion status, and token usage before integrating advanced features.
How much does the Kimi K3.1 Pro API cost?
The official listed rates are $2.00 per million ordinary input tokens and $10.00 per million output tokens. LinkModel lists $1.90/M input and $9.50/M output, which are 5% lower on the corresponding standard token categories. Cache-related charges use separate rates.
Can I try Kimi K3.1 Pro API with free credits?
Yes. New LinkModel users automatically receive $1 in free Credits upon registration, with no card binding or recharge required. The reward does not expire and can be used toward any model currently available on LinkModel. It is a one-time signup benefit.
Does Kimi K3.1 Pro support Function Calling?
Yes. Kimi K3.1 Pro supports function calling. Developers can define tools and use model-generated tool-call requests to coordinate application operations. The application must execute the tools and return their results through the supported API protocol.
Why does Kimi K3.1 Pro use so many tokens?
Coding and reasoning tasks may use substantial tokens for context processing, reasoning, intermediate tool activity, and repeated requests. Inspect prompt, completion, reasoning, and cache-related usage to understand the cost. Reasoning tokens reported within completion usage should not be counted twice.
Conclusion
To use the Kimi K3.1 Pro API effectively, start with an authenticated request, confirm the model and response fields, verify generated code, and track token consumption across the full task. Our PowerShell example demonstrates a successful Kimi K3.1 Pro code-generation request with detailed usage reporting. For developers who want to manage model costs through a unified API, LinkModel offers 5% lower published Kimi K3.1 Pro token rates, $0 minimum spend, and $0 monthly platform fee. Visit the Kimi K3.1 Pro model page to review current pricing and begin testing with the available $1 new-user Credits.