The GPT Image 2.6 Image Editing API enables developers to modify existing images using natural-language prompts, markup annotations, and mask-guided editing. Instead of generating every visual asset from scratch, developers can upload an original image, identify what needs to change, and create an edited result. With GPT Image 2.6 Flare and Sunburst, these capabilities support product photography, advertising assets, background replacement, object removal, and iterative visual design.
The challenge is making a precise change without damaging details that should remain untouched. Recoloring a product should not alter its logo, shape, or material. Removing an object should not unexpectedly rewrite nearby text. Repeated edits can also introduce inconsistencies that make an otherwise attractive image unsuitable for commercial use. Choosing the correct editing method, configuring quality and complexity, and reviewing each result are essential to building a reliable workflow.
LinkModel provides GPT Image 2.6 Flare and Sunburst at 35% lower corresponding published token rates through November 30, 2026. Developers can access supported models through a unified API platform with $0 minimum spend and $0 monthly platform fee. New users automatically receive $1 in free Credits after registration, with no payment card or recharge required. Existing users cannot claim the reward repeatedly; the Credits never expire and apply to all models currently available on LinkModel. This gives developers a lower-cost way to explore image editing, compare model options, and plan production usage.
What Is the GPT Image 2.6 Image Editing API?
The GPT Image 2.6 Image Editing API allows developers to upload existing images and generate modified versions through API requests. It can change objects, replace backgrounds, adjust visual styles, remove unwanted elements, and refine image details while using the original image as a reference.
The two available models are:
- GPT Image 2.6 Flare: gpt-image-2.6-flare, designed for faster iteration and responsive image-editing workflows.
- GPT Image 2.6 Sunburst: gpt-image-2.6-sunburst, designed for more demanding visual detail, layout, and editing-accuracy requirements.
Both models support image generation and editing. The main difference is their intended optimization: Flare prioritizes iteration speed, while Sunburst is positioned for tasks requiring greater visual precision.
Image Editing vs. Text-to-Image Generation
The difference is whether the workflow starts with an existing image.
| Feature | Text-to-Image | Image Editing API |
|---|---|---|
| Starting input | Text prompt | Existing image and editing instructions |
| Main purpose | Create a new image | Modify an existing image |
| Subject reference | Described through text | Provided through image input |
| Editing scope | New composition | Entire image or guided regions |
| Typical tasks | Concept art, illustrations, new assets | Product recoloring, object removal, background replacement |
For example, a text-to-image request might create a handbag advertisement from a written description. An image-editing request starts with an existing handbag photograph and changes its color while attempting to preserve the original stitching, hardware, lighting, and composition.
That distinction matters for commercial applications. A product team often needs modifications to an approved asset rather than an entirely new visual interpretation.
What Can GPT Image 2.6 Edit?
The API supports several practical editing tasks.
| Editing Task | Example Instruction | Details to Preserve |
|---|---|---|
| Background replacement | Replace a studio background with a beach | Product edges, lighting, shadows |
| Object recoloring | Change a striped vase to cobalt blue | Shape, material, reflections |
| Object removal | Remove a phone from a desk | Nearby text, surface texture |
| Style transformation | Convert a photograph into a watercolor illustration | Composition, subject identity |
| Text replacement | Translate an infographic | Layout, alignment, surrounding graphics |
| Product modification | Change the finish of a handbag | Logo, geometry, hardware |
These tasks have different levels of difficulty.
Replacing an empty background is not equivalent to removing an object beside handwritten notes. Similarly, recoloring one clearly visible object is usually easier to describe than identifying one of several nearly identical products.
The right editing method depends on how precisely the target must be identified and how important original-image preservation is.
How to Edit Images with GPT Image 2.6 API
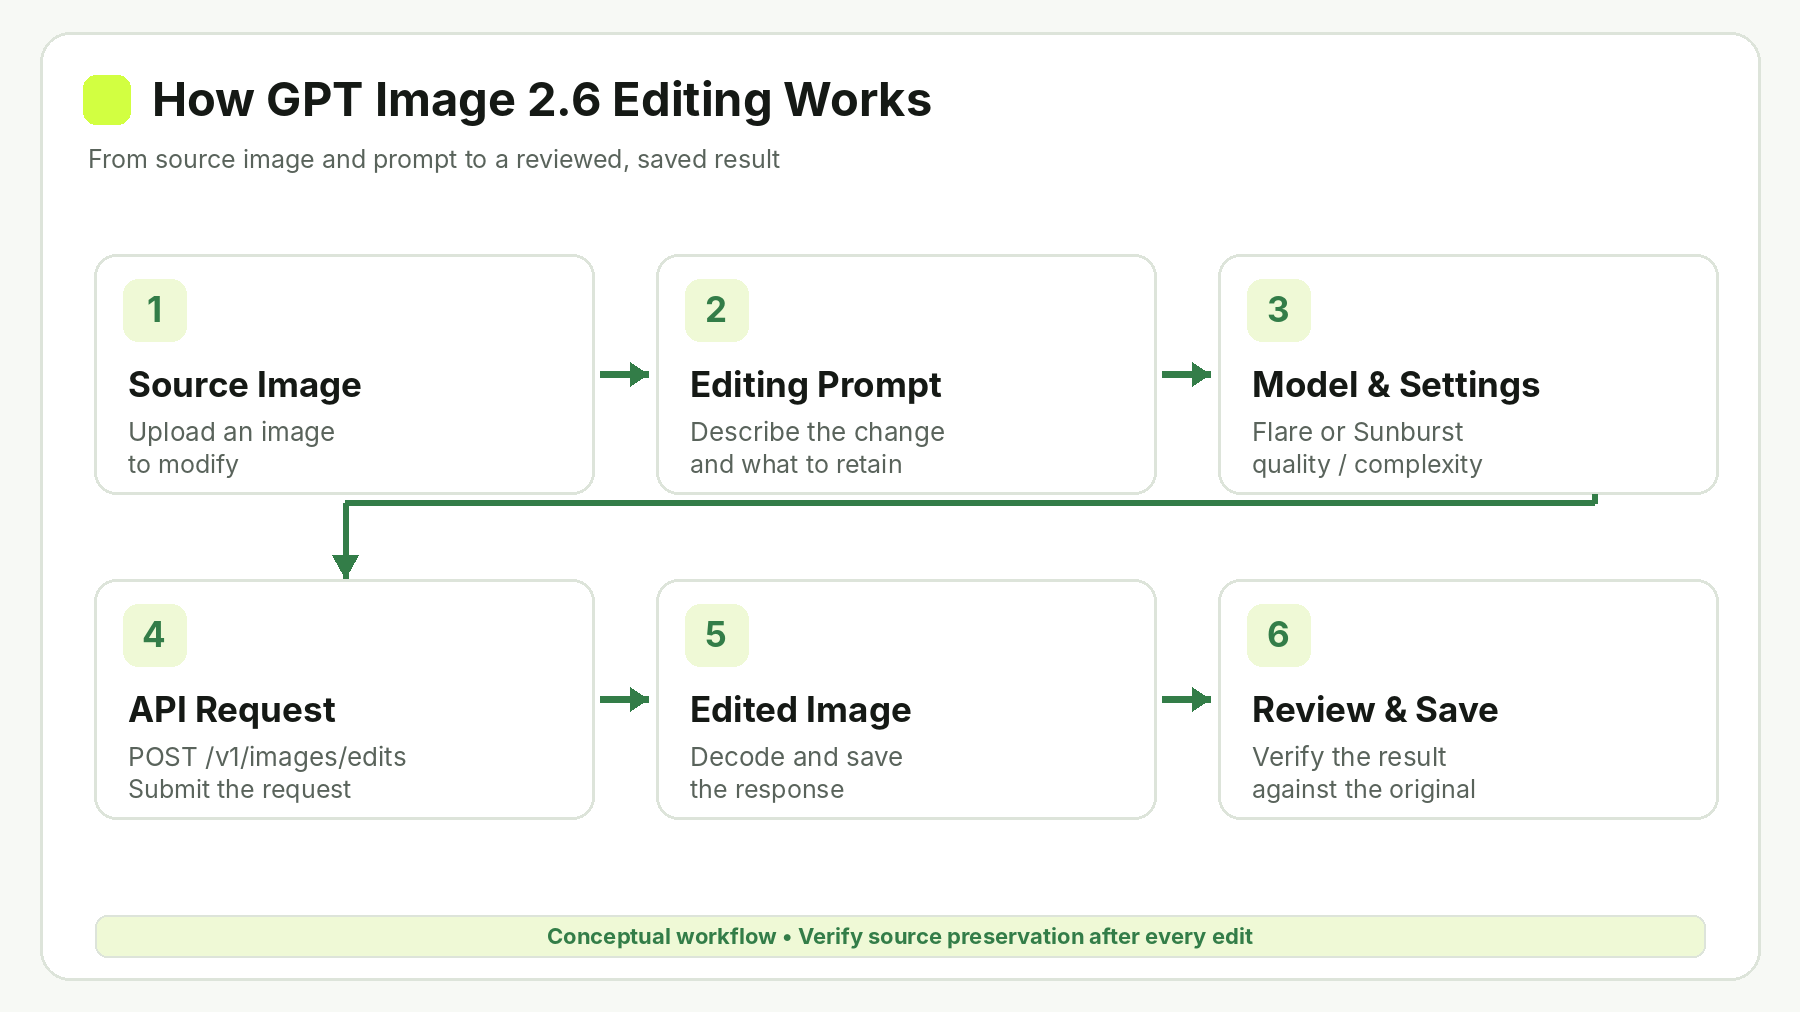
The most direct way to edit an existing image is through the Image API endpoint POST /v1/images/edits.
A basic request includes the original image, editing instructions, and the selected GPT Image 2.6 model.
For conversational or multi-step editing, the Responses API supports image generation within a continuing interaction.
Prepare the Original Image
Before submitting a request, identify the image elements that should remain unchanged.
For a product photograph, this may include the product's shape, material, logo, printed labels, camera angle, shadows, and background.
GPT Image models support PNG, JPEG, and WebP image inputs, subject to applicable file requirements. The documented Image API editing workflow supports up to 16 input images, allowing developers to provide additional visual references when needed.
For example, a product-editing request may use the original product photograph as the primary image and a second photograph to communicate a desired material or visual style.
The prompt should explain the role of each reference image rather than leaving the relationship ambiguous.
Write a Precise Editing Prompt
An effective image-editing prompt should explain what must change and what must remain unchanged.
For example:
Change the red handbag to dark brown leather. Preserve the original handbag shape, proportions, stitching, metal hardware, camera angle, lighting, and background. Do not add new objects or modify other parts of the image.
This instruction describes the target modification and establishes preservation requirements.
A useful prompt should identify the target object, the intended transformation, the visual constraints, and any details that must remain consistent.
For tasks involving several similar objects, text instructions may be insufficient. Markup annotations or a supported mask workflow can provide additional spatial guidance.
Choose Quality and Complexity
GPT Image 2.6 provides two separate controls that affect image output: quality and complexity.
| Parameter | Purpose | Available Values |
|---|---|---|
quality | Controls rendered visual detail, including textures and small lettering | auto, low, medium, high, xhigh, max |
complexity | Controls how much planning the model performs before rendering | low, medium, high |
Both Flare and Sunburst use high complexity by default when the parameter is omitted.
Complexity does not carry a separate parameter fee, although its effect on latency and generated content can influence the overall workflow.
A practical starting configuration might look like this:
| Editing Task | Starting Quality | Starting Complexity |
|---|---|---|
| Simple background replacement | Medium | Low |
| Single-object recoloring | Medium | Low |
| Product detail refinement | High | Medium |
| Dense infographic editing | High | High |
| Complex scene reconstruction | High | High |
These settings are starting recommendations, not guaranteed optimal configurations.
For a simple object recoloring, low complexity may provide enough planning. A dense layout containing multiple subjects, text blocks, or overlapping objects may require more careful processing.
Higher complexity does not automatically produce a better edit. Evaluate changes in quality and complexity separately so that you can identify which setting improves the result.
Submit an Image Editing Request
The following table summarizes the essential fields in an Image API editing request.
| Request Field | Purpose |
|---|---|
| Endpoint | POST /v1/images/edits |
| Authentication | Bearer API key |
model | gpt-image-2.6-flare or gpt-image-2.6-sunburst |
image | Original image file |
prompt | Description of the requested modification |
quality | Output rendering quality |
complexity | Planning effort |
size | Supported output dimensions |
output_format | png, jpeg, or webp |
For a basic editing request, follow these steps.
1. Select the model. Choose Flare for iteration-focused workflows or Sunburst for more demanding image-editing requirements.
2. Upload the source image. Send the image as multipart form data using the image input field.
3. Provide the prompt. Specify the requested modification and any preservation requirements.
4. Configure the output. Set quality, complexity, dimensions, and format where necessary.
5. Submit the request. Send it to the documented Image API editing endpoint.
6. Save the returned image. Extract the returned Base64 image data, decode it, and save it using the selected image format.
The Image API returns image data that the application can decode into a usable file.
A completed API request only indicates that the request was processed. The visual result still needs to be evaluated against the editing requirements.
For LinkModel access, developers can start from the GPT Image 2.6 Flare or Sunburst model pages and consult the platform's API documentation for the available integration options.
Review and Refine the Output
Before accepting an edited image, compare it with the original.
Check whether the intended object was modified, whether important source details remain recognizable, and whether the model introduced unexpected changes.
Pay particular attention to product logos, printed labels, small text, reflections, object boundaries, and shadows.
If the output requires further modification, use a refined prompt or submit the previous result as the source for another editing round.
For commercial applications, review should be part of the workflow rather than an optional step after publication.
Prompt vs. Markup vs. Mask: Which Image Editing Method Should You Use?
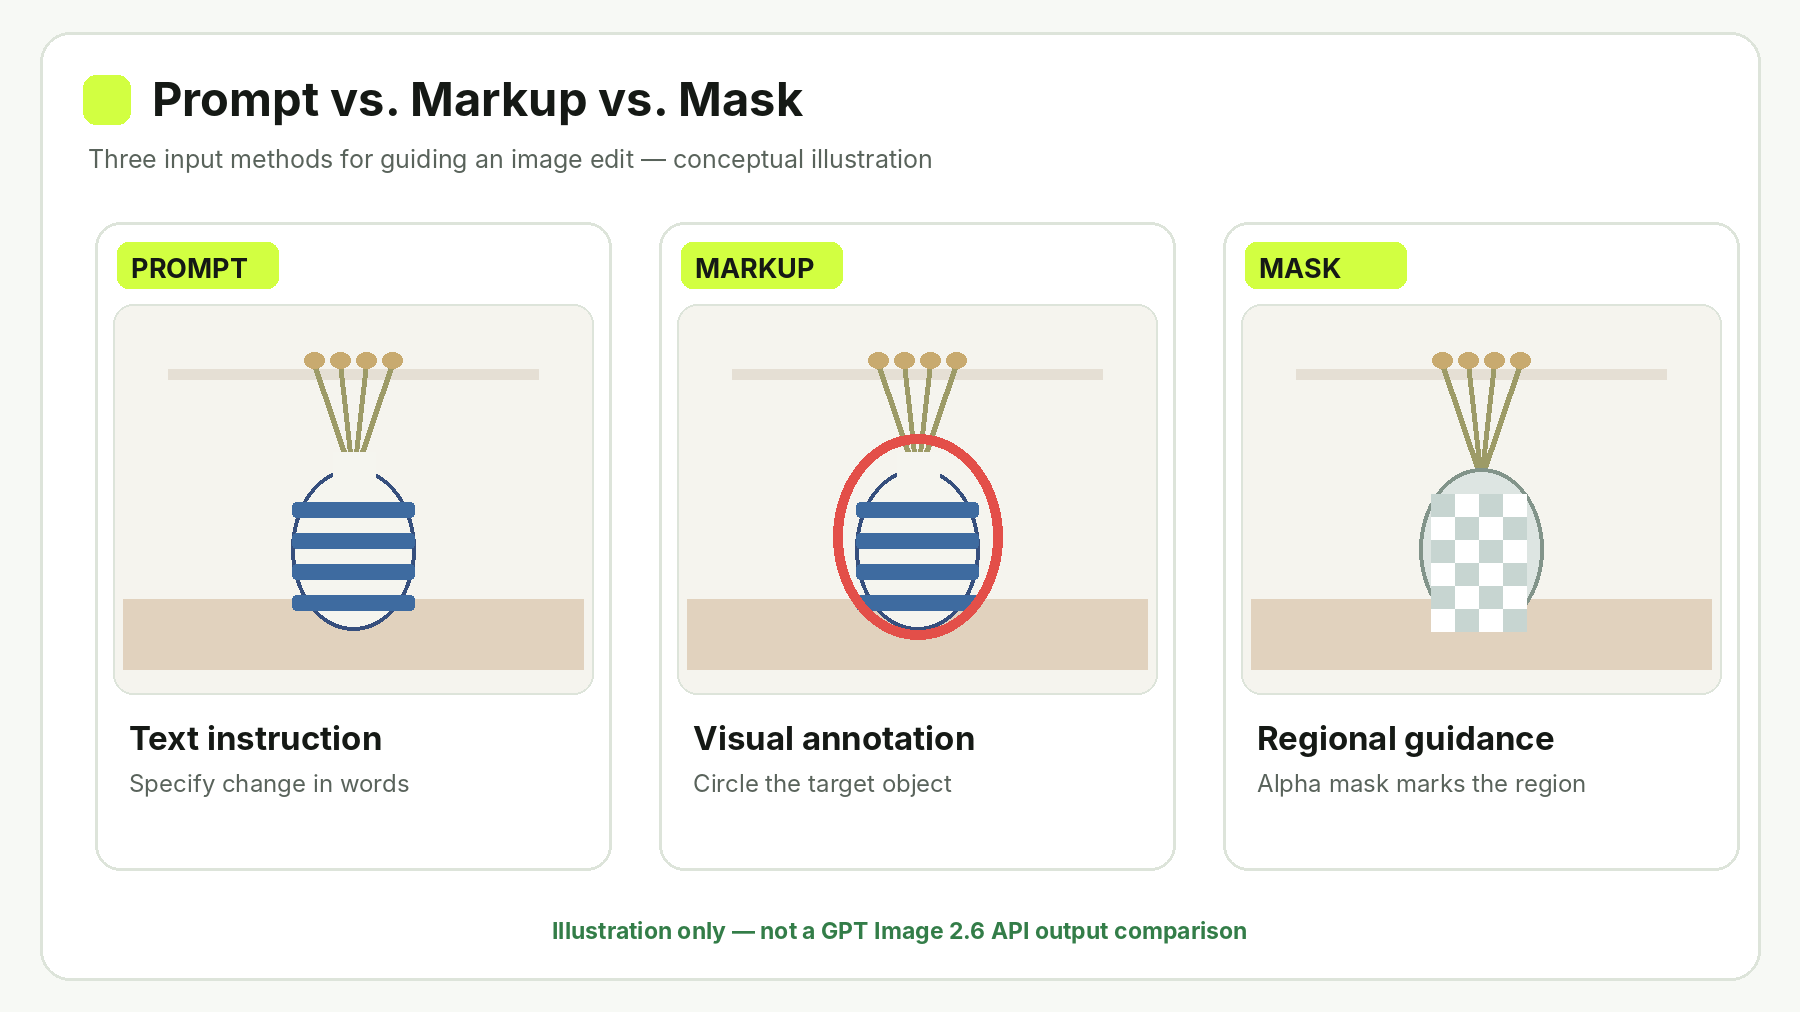
GPT Image 2.6 supports different ways to communicate an editing instruction.
The main distinction is between describing a change in text, showing the model where to focus with visual annotations, and supplying a regional mask.
| Editing Method | How It Works | Best Use | Key Limitation |
|---|---|---|---|
| Prompt-based | Describes the modification in natural language | Clearly identifiable objects or broad changes | The model interprets the editing target |
| Markup-guided | Uses a transparent PNG annotation layer | Identifying a specific object or area | Annotations are guidance, not exact boundaries |
| Mask-guided | Uses an alpha-channel image to identify the intended editing region | Localized modifications | The model may not follow the mask precisely |
Prompt-Based Editing: When Text Is Enough
Prompt-based editing requires only the original image and a natural-language instruction.
For example:
Replace the cloudy sky with a clear blue sky. Keep the buildings, trees, road, and camera angle unchanged.
This is appropriate when the target is obvious and does not require additional visual identification.
It is particularly useful for simple recoloring, background replacement, and broad visual transformations.
Markup-Guided Editing: When You Need to Identify an Object
Markup-guided editing is useful when describing an object in text may not be enough.
For instance, a kitchen photograph may contain several decorative objects. A transparent annotation layer can identify the exact vase that should be recolored.
OpenAI's official GPT Image 2.6 example demonstrates markup-guided editing using a kitchen photograph and a transparent red-circle overlay. The same source image and editing instruction are used with Flare and Sunburst.
Both models recolor the striped vase to cobalt blue and remove the annotation, allowing readers to inspect the requested change and compare the surrounding scene with the original.
The official workflow uses the original image as the first input and a separate transparent PNG as the markup input.
The annotation layer must meet several requirements:
1. It must be a transparent PNG.
2. Its dimensions must match the first input image after orientation.
3. It must remain a separate annotation layer rather than being flattened onto the original.
4. The first input image and markup layer can each contain up to 16,777,216 pixels.
5. The markup file has a 50 MB size limit.
6. Markup cannot be combined with Mask in the same request.
The prompt should explain what the annotation represents and whether the annotation itself should disappear from the final image.
In the official vase example, the instruction explicitly requests that the red circle be removed after recoloring the object.
This demonstrates why markup can be useful for identifying a specific target without treating the annotation as part of the final visual composition.
Mask-Guided Editing: When You Need Regional Guidance
A mask provides an additional indication of the region intended for modification.
It is typically supplied as an image with an alpha channel. Transparent areas identify where the edit should occur.
OpenAI documents mask-based editing through the Image API and also illustrates regional editing using input_image_mask in a Responses API workflow.
When multiple source images are provided, the mask applies to the first image.
A mask is not a pixel-perfect lock. GPT Image uses the mask as guidance and may make changes beyond the precise mask boundary.
This matters for workflows that require exact preservation of a logo, a person's face, or a product's geometry.
When strict pixel-level preservation is necessary, developers can combine AI-generated edits with conventional compositing or other deterministic image-processing techniques.
Which Editing Method Should You Choose?
Use the simplest method that provides enough control for the task.
| Editing Situation | Recommended Method | Reason |
|---|---|---|
| Replace an entire background | Prompt | The target is easy to describe |
| Recolor one vase among several objects | Markup | The annotation identifies the target |
| Modify a specified visual region | Mask | Regional guidance narrows the intended area |
| Make several unrelated changes | Separate editing rounds | Each modification can be reviewed independently |
For any approach, the result should be checked against the original image.
The best editing method is not necessarily the most complicated one. It is the method that communicates the required change while minimizing unnecessary modifications.
How to Preserve Image Details and Maintain Consistency Across Edits
A successful image edit must satisfy two conditions: complete the requested modification and preserve the visual details that remain important.
This distinction is especially important for product photography, advertising, brand assets, and images containing readable text.
A photograph may look attractive after editing while becoming unsuitable for its intended use because a logo, label, shape, or nearby object has changed.
What Real-World Editing Examples Reveal
OpenAI also demonstrates a localized object-removal task in which Flare and Sunburst remove a flower from a man's hand. The source and edited outputs provide a useful preservation check: whether the person's appearance, pose, clothing, lighting, and overall composition remain consistent after removing the flower.
This example illustrates why object-removal results should be compared with the original photograph, rather than judged only by whether the target object disappeared.
A separate independent editing review published on November 7, 2026, reported another instructive example involving a desk photograph.
The reviewer requested the removal of several objects from the desk. The edited result removed the specified objects, but also changed handwritten text in a nearby notebook.
The lesson is important for production workflows: a successful local edit does not guarantee that unrelated details have been preserved. When comparing source and edited images, inspect high-risk details such as handwritten text, product labels, object boundaries, and lighting.
These elements can be overlooked when the requested modification appears successful.
Evaluate Image Editing Quality Across Four Dimensions
A practical editing-quality framework should separate the requested modification from other changes in the image.
| Dimension | Evaluation Question | Example Failure |
|---|---|---|
| Edit Accuracy | Did the model complete the requested modification? | The wrong object was recolored |
| Visual Preservation | Did unrelated content remain stable? | A product label changed |
| Multi-Turn Consistency | Did the subject remain recognizable across edits? | A character's facial details drifted |
| Artifact Control | Did the result introduce visible defects? | Distorted edges or inconsistent textures |
These dimensions are useful because different editing tasks can fail for different reasons.
For a background replacement, visual preservation may focus on the subject's edges and lighting. For an infographic translation, the most important factors may be text accuracy, spacing, and layout.
Improve Multi-Turn Editing Consistency
Multi-turn editing allows developers to refine an image across successive requests.
However, each new editing round can introduce additional visual changes.
A controlled workflow should therefore proceed in stages:
1. Start with the original image and a clearly defined modification.
2. Generate the first edited result.
3. Compare the result with the source.
4. Use the accepted output as the next editing input.
5. Apply the next modification while repeating important preservation requirements.
6. Review the final output against both the previous version and the original.
For example, an e-commerce team might replace a product background, adjust its color, remove a distracting object, and prepare a final advertising composition.
Separating those changes makes it easier to detect when an unwanted modification occurs.
The Responses API supports conversational image workflows, but previous context does not guarantee perfect visual consistency.
Each intermediate result still needs to be reviewed.
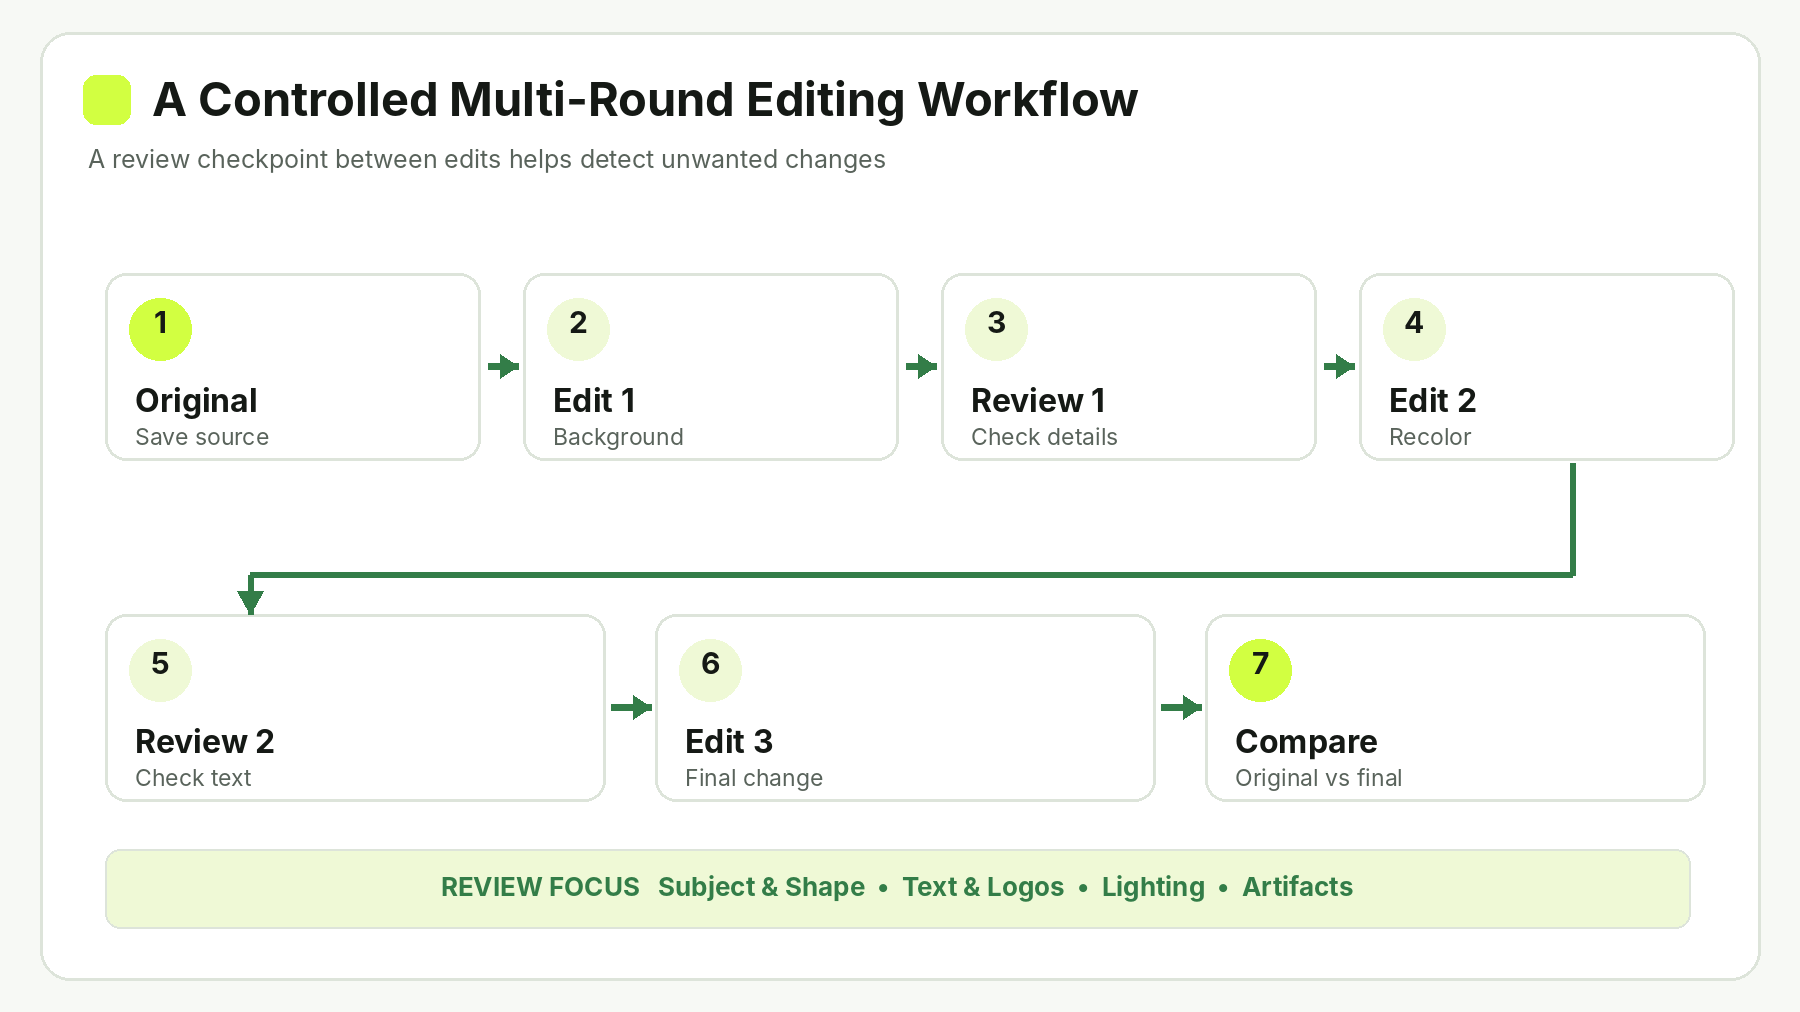
Image Editing Quality Checklist
Before accepting an output, verify the following conditions.
| Check | Acceptance Requirement |
|---|---|
| Target modification | The requested change is complete |
| Product geometry | Shape and proportions remain correct |
| Text and logos | Required wording and marks remain accurate |
| Lighting | Shadows and reflections are coherent |
| Background | No unexpected objects appear |
| Artifacts | No distracting structural or texture defects |
| Output specifications | Dimensions and format meet the application requirements |
For automated applications, these checks can guide the design of human review, image-difference analysis, and workflow-specific validation.
GPT Image 2.6 Image Editing API Pricing: OpenAI vs. LinkModel
GPT Image 2.6 uses token-based pricing, so the cost of editing an image depends on the tokens consumed by text input, image input, and generated image output.
There is no fixed cost that applies to every edit regardless of source dimensions, output quality, or the number of editing rounds.
GPT Image 2.6 API Pricing Comparison
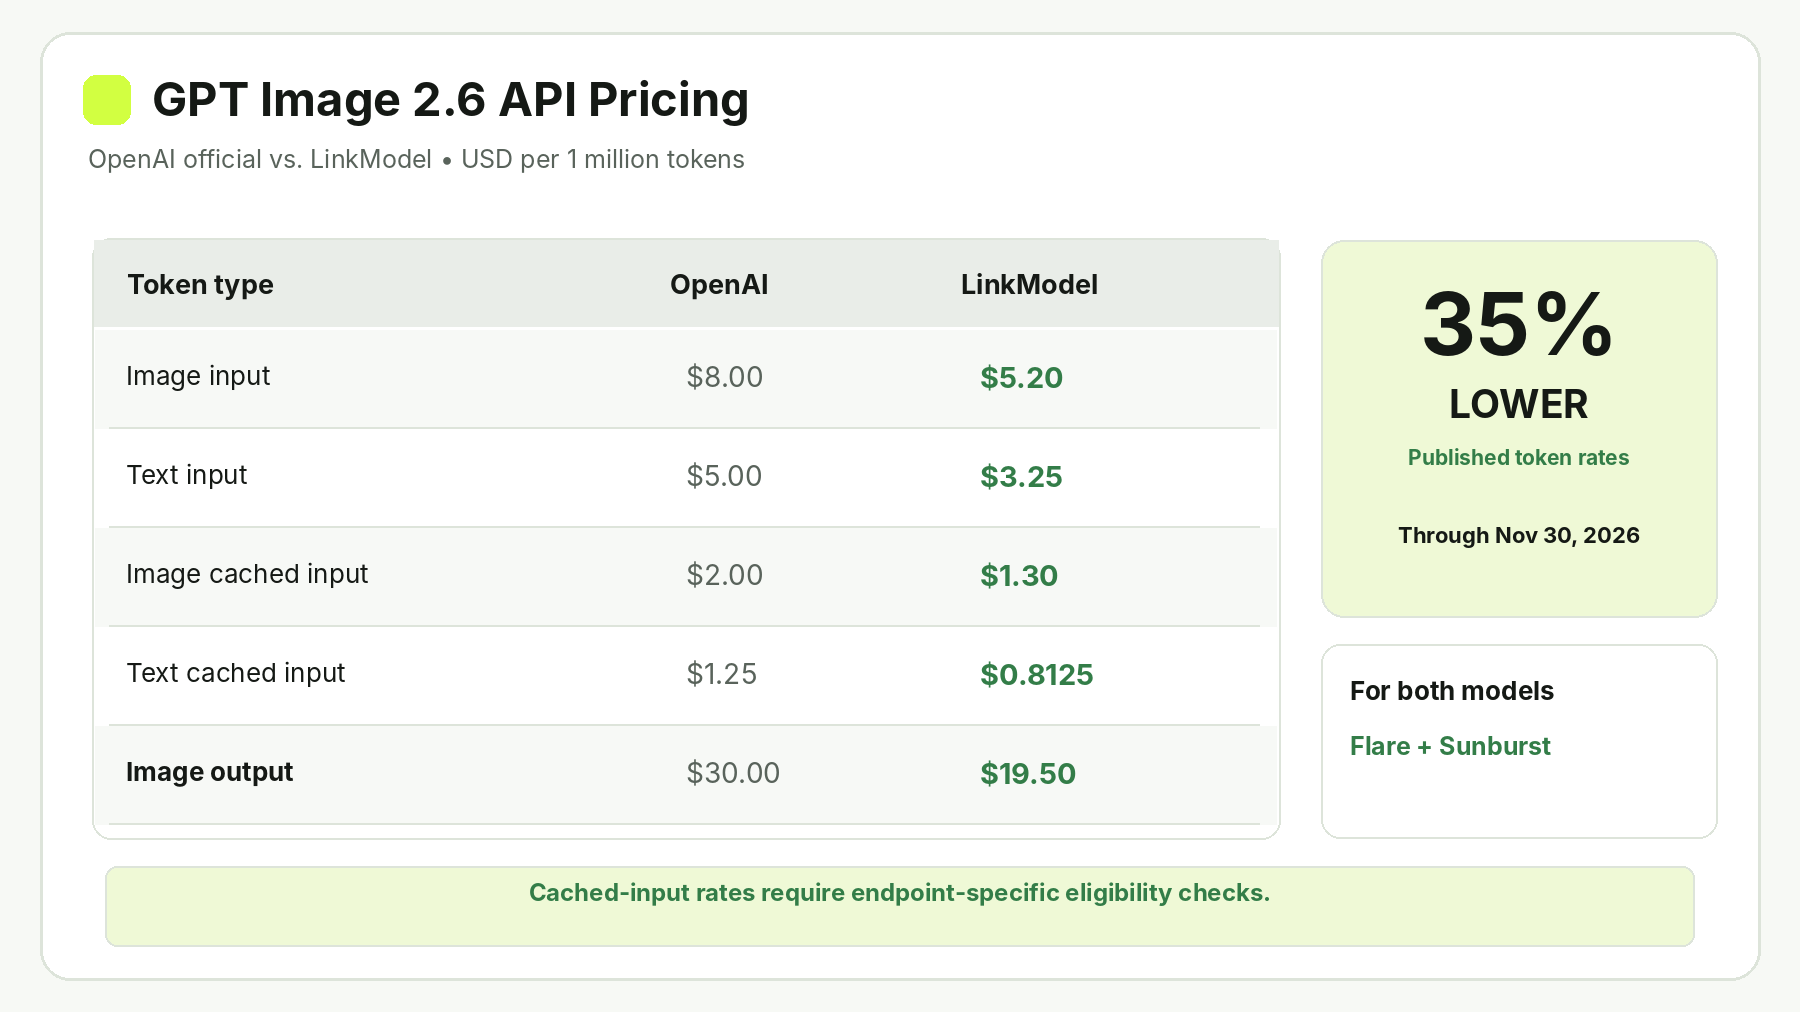
LinkModel lists the same token rates for GPT Image 2.6 Flare and Sunburst.
| Token Type | OpenAI Official | LinkModel | Savings |
|---|---|---|---|
| Image Input | $8.00 | $5.20 | 35% |
| Text Input | $5.00 | $3.25 | 35% |
| Image Cached Input | $2.00 | $1.30 | 35% |
| Text Cached Input | $1.25 | $0.8125 | 35% |
| Image Output | $30.00 | $19.50 | 35% |
All rates are in USD per 1 million tokens.
Through November 30, 2026, LinkModel charges 65% of OpenAI's corresponding standard token rates, a 35% reduction across the five listed categories.
At these rates, 1 million image output tokens cost $30 through OpenAI and $19.50 through LinkModel, a difference of $10.50 per million image output tokens.
The same proportional discount applies to the listed text and image input rates.
How to Calculate the Cost of an Image Edit
A practical cost estimate begins with the three standard token categories.
Total Cost = Text Input Cost + Image Input Cost + Image Output Cost
For each category, multiply the token quantity by its rate per million tokens, then divide by 1,000,000.
Consider an editing request with these assumed token quantities:
| Token Type | Assumed Usage |
|---|---|
| Text Input | 1,000 |
| Image Input | 20,000 |
| Image Output | 1,000 |
The resulting cost is:
| Component | OpenAI Official | LinkModel |
|---|---|---|
| Text Input | $0.00500 | $0.00325 |
| Image Input | $0.16000 | $0.10400 |
| Image Output | $0.03000 | $0.01950 |
| Total | $0.19500 | $0.12675 |
For this token usage, LinkModel reduces the calculated cost by $0.06825 per edit, or 35%.
The actual price of an editing request changes with the number of input and output tokens it consumes.
How Repeated Editing Affects the Budget
A complete editing task may require multiple requests.
Suppose a product photograph needs three editing rounds, each with the same token usage as the example above.
| Metric | OpenAI Official | LinkModel |
|---|---|---|
| Cost per Round | $0.19500 | $0.12675 |
| Number of Rounds | 3 | 3 |
| Total Project Cost | $0.58500 | $0.38025 |
| Total Savings | — | $0.20475 |
As the number of requests increases, the absolute difference between the matching published token rates grows.
However, the cost of completing a satisfactory task also depends on how many editing rounds are necessary.
For production budgeting, cost per accepted image is often more useful than cost per individual request.
If a workflow regularly needs several corrections, that additional usage should be included in budget planning.
Does Cached Input Pricing Apply to Every Image Edit?
No. Cached input pricing depends on the model and request workflow.
OpenAI documents different caching rules for different image-generation models and endpoints. The documented cached-input treatment for GPT Image 2 and 2.5, for example, does not apply to direct Images API editing requests in the same way as the Responses API image-generation tool.
LinkModel lists cached token rates for GPT Image 2.6, but developers should check whether the particular editing request qualifies for cached billing before applying those rates.
For a straightforward estimate, calculate standard text input, image input, and image output costs first.
Add cached rates only when they apply to the actual request.
What Should Developers Know About Low- and Medium-Quality Token Usage?
One developer's November 2026 comparison of GPT Image 2.5 and 2.6 reported higher output-token consumption for GPT Image 2.6 at low and medium quality settings.
The reported test used the same prompt and 1536 × 1024 dimensions through the image-generation endpoint.
| Quality | GPT Image 2.5 | GPT Image 2.6 |
|---|---|---|
| Low | 158 tokens | 664 tokens |
| Medium | 343 tokens | 1,132 tokens |
| High | 1,372 tokens | 1,353–1,372 tokens |
The reported results concern image generation, not a controlled benchmark of the image-editing endpoint.
Nevertheless, they highlight a practical budgeting consideration: choosing a lower quality setting does not necessarily produce a proportional reduction in token consumption.
Developers should examine the usage returned by their chosen model and compare different configurations with representative workloads.
GPT Image 2.6 Flare vs. Sunburst: Which Model Should You Choose?
GPT Image 2.6 Flare and Sunburst have different intended roles.
OpenAI positions Flare as the smaller model for faster image workflows and Sunburst as the base model for tasks requiring more demanding visual detail, layout, or editing accuracy.
Both have the same published standard token rates, so model selection should focus on the quality and performance required by the editing task.
| Decision Factor | GPT Image 2.6 Flare | GPT Image 2.6 Sunburst |
|---|---|---|
| Model Positioning | Smaller, iteration-focused model | Base model for demanding visual work |
| Primary Priority | Response time | Visual detail and editing accuracy |
| Starting Tasks | Quick revisions and everyday edits | Complex compositions and detail-sensitive edits |
| Evaluation Focus | Speed and acceptable output quality | Accuracy and preservation of important details |
| Published Token Rates | Same as Sunburst | Same as Flare |
What Does the Official Comparison Show?
OpenAI's official prompting guide provides a kitchen image-editing example using the same source photograph and editing instruction for both models.
The task is to recolor a striped vase to cobalt blue while preserving its shape, dried stems, and the surrounding kitchen.
Both Flare and Sunburst complete the requested recoloring and remove the red markup annotation.
The published comparison establishes that both models completed this particular editing instruction, not that either model wins every editing task. Developers should compare preservation of unrelated details, editing accuracy, response time, and token usage on their own workloads before choosing a production model.
The official object-removal example provides another comparison opportunity because both models receive the same request to remove a flower while preserving the surrounding scene.
Together, these examples show why a fair comparison should examine both the modified object and the elements that were supposed to remain unchanged.
When Should You Choose Flare?
Start with Flare when the workflow prioritizes iteration speed.
Typical use cases include frequent background revisions, early advertising drafts, social media image variants, and interactive editing applications.
Flare can also be a sensible model to evaluate first when the requested modification is relatively simple and does not require intricate visual reconstruction.
The key decision is whether its output meets the application's acceptance requirements.
When Should You Choose Sunburst?
Start with Sunburst when the image has more demanding requirements for visual details, layout, or precise editing.
Examples include complex product photographs, images containing several interacting objects, and tasks where unwanted changes could make the result unsuitable for use.
Sunburst is not automatically the better choice for every image.
When both models meet the required visual standard, the more appropriate model is the one that delivers the workflow's preferred balance of responsiveness, editing accuracy, and total task cost.
Build a More Reliable Image Editing Workflow
A production-oriented image-editing process should connect model selection with validation and cost measurement.
| Stage | Recommended Action | Why It Matters |
|---|---|---|
| Prepare | Validate the source image and editing target | Prevent ambiguous or unsupported inputs |
| Select | Choose Flare or Sunburst | Match the model to the task |
| Guide | Use Prompt, Markup, or Mask | Communicate editing intent |
| Configure | Adjust Quality and Complexity | Balance detail and processing requirements |
| Generate | Submit the request and save the result | Obtain the edited image |
| Review | Compare the result with the original | Detect unexpected changes |
| Measure | Record tokens and accepted results | Estimate complete task cost |
This workflow is especially useful for developers building applications that perform repeated image edits.
Instead of evaluating a model only by whether one request succeeds, teams can evaluate the complete task: the requested changes, the preserved details, the number of iterations, and the resulting cost.
Important GPT Image 2.6 API Limitations
Several limitations matter in production environments.
Markup and Mask are editing guidance, not exact pixel-preservation mechanisms. They can help identify the intended region, but unrelated details may still change.
Multi-turn editing can introduce visual drift, especially when each new request uses an already modified image.
Small text, product labels, reflections, and nearby objects deserve additional attention because changes to these details may be harder to notice.
Actual token consumption can also vary by output size, quality, model configuration, and the number of editing rounds.
Finally, access requirements and supported integration features should be checked against the selected API provider's current documentation.
Frequently Asked Questions
Can GPT Image 2.6 edit existing images through an API?
Yes. GPT Image 2.6 supports editing existing images through the Image API endpoint POST /v1/images/edits. Developers provide a source image, an editing prompt, and either gpt-image-2.6-flare or gpt-image-2.6-sunburst.
How can I edit one object without changing the rest of the image?
Identify the target object in the prompt and explicitly describe which details must remain unchanged. For a difficult-to-identify target, use Markup or a supported Mask workflow. Compare the edited result with the source because neither method guarantees exact pixel preservation.
What is the difference between Markup and Mask editing?
Markup uses a transparent PNG annotation layer containing circles, arrows, or other visual indicators. Mask editing uses an alpha-channel image to guide the intended editing region. Markup and Mask cannot be combined in the same request.
Can GPT Image 2.6 maintain consistency across multiple edits?
GPT Image 2.6 supports iterative editing workflows, including multi-turn interactions through the Responses API. To improve consistency, preserve previous outputs, repeat important visual constraints, and review each new image against the original.
How much does GPT Image 2.6 Image Editing API cost?
The cost depends on text input, image input, and image output tokens. OpenAI's standard rates are $5 per million text input tokens, $8 per million image input tokens, and $30 per million image output tokens. LinkModel's corresponding listed rates are $3.25, $5.20, and $19.50 through November 30, 2026, representing 35% lower rates.
Conclusion
The GPT Image 2.6 Image Editing API gives developers a practical way to modify existing images through natural-language prompts, markup annotations, mask-guided editing, and iterative refinement. The most important decisions are how to identify the editing target, preserve important visual details, and choose a model that meets the application's requirements. Flare is a practical starting point for fast iteration, while Sunburst is designed for more demanding visual work. Production teams should evaluate the complete editing workflow, including review and repeat requests, rather than relying only on the first generated result. With both models available and 35% lower corresponding published token rates through November 30, 2026, LinkModel offers a cost-conscious option for developers planning AI image-editing applications.